


HubSpot already knows when a new lead comes in, a deal moves forward, or a support ticket changes status. With Textmagic connected, these CRM events can start an SMS automation right away.
But sending texts is only part of what our integration does. HubSpot contacts sync into Textmagic, texts and replies can be logged on the HubSpot contact timeline, and automation actions can write information back to HubSpot.
Today, we look at ten useful Textmagic and HubSpot automations that will help you get more value out of your HubSpot account.
This integration is new and we’re still building on it. More triggers and actions are on the way. If something you need isn’t here yet, let us know, it influences what we build next.
1. Welcome new leads while they are interested
A new lead just filled out a form, requested information, or was added to your CRM. Waiting until someone notices the record can mean losing the moment when their interest is highest.
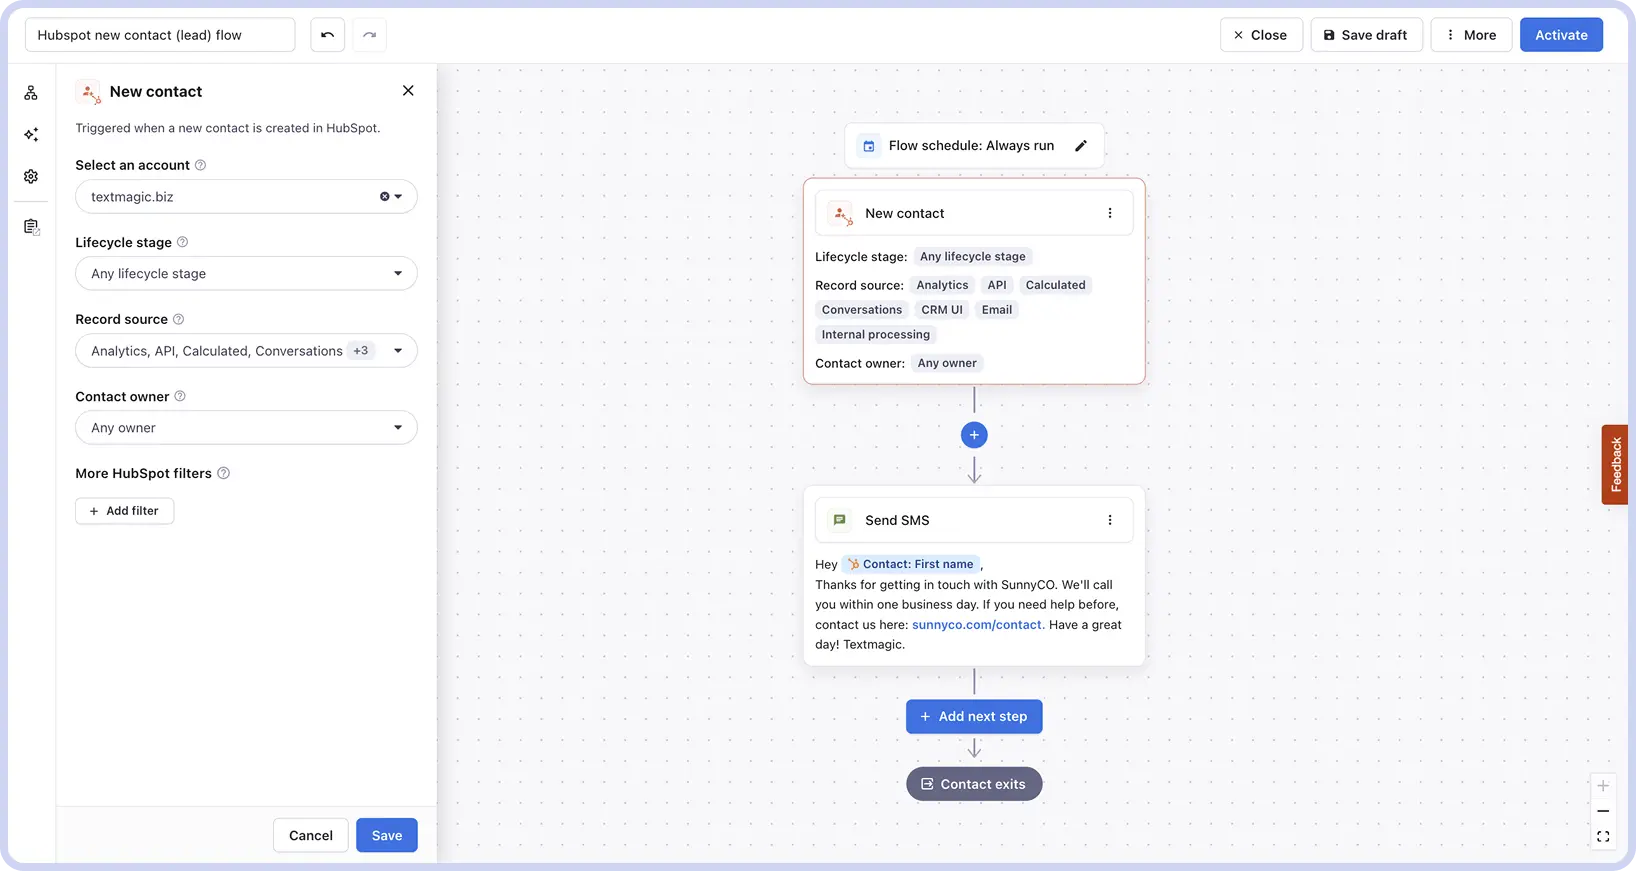
You can use the New contact trigger to send a short welcome text as soon as the contact enters HubSpot.
- Trigger: New contact
- Actions: Send SMS
- Sample message: Hi {First name}, thanks for getting in touch with Acme. We’ll call you within one business day. Reply here anytime. Reply STOP to opt out.
Narrow the automation down with filters
This trigger, left unfiltered, will fire for every new contact created in HubSpot, including imports and records your team adds manually. Add at least one filter so only the contacts you actually want to message enter the automation:
- Lifecycle stage: limit the flow to Lead or Subscriber
- Record source: include only the sources you want to message (leave imports unchecked)
- Contact owner: send different messages based on the assigned owner
Ways to expand this automation:
Once the basic flow is working, you can:
- Use the wait until event happens rule to pause for a relevant action on the contact (deal updated, contact updated, ticket created, etc.) before sending a follow-up text;
- Create different welcome texts for each agent (with the filter by contact owner option);
- Create a HubSpot task so the owner has a follow-up waiting for them
- Add the contact to a Textmagic list or add a tag to the contact for future campaigns.
2. Send a different SMS for each HubSpot form
Not every form submission calls for the same follow-up. Someone downloading a guide probably needs a different message from someone requesting a demo or asking about pricing.
HubSpot records the last form a contact submitted in a default property called Recent conversion, and it updates that property on every submission. Map it to Textmagic, and you can use it to match the first SMS to the form the contact filled in.
- Trigger: Contact property updated
- Property to watch: Recent conversion
- Condition: Contains → your form name
- Actions: Send SMS
Build one flow per form, each with its own name in the filter and its own message.
A form submission only creates a new contact the first time someone converts. An existing contact who comes back and requests a demo or downloads a pricing guide won’t create a new record, so a New contact trigger would skip them, and those are often the people most worth texting.
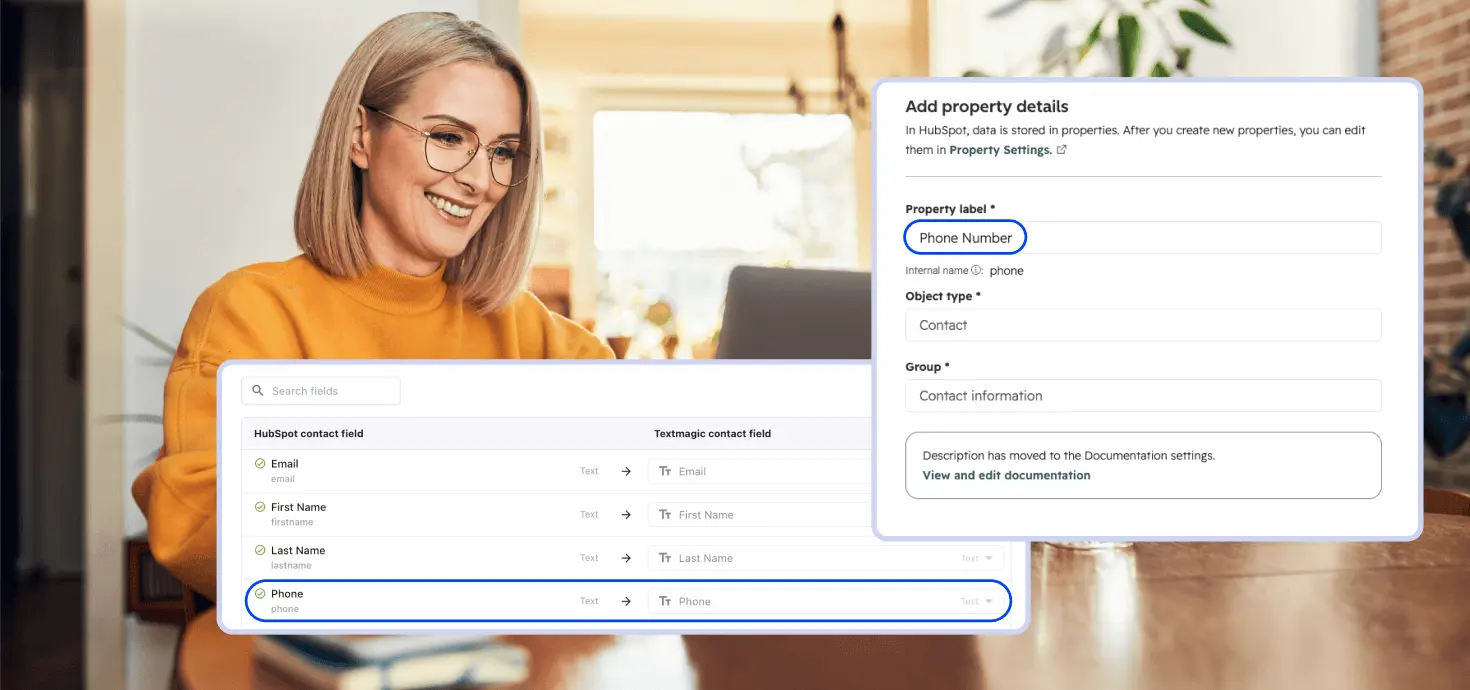
Make sure the form stores the phone number in the HubSpot property you mapped to Textmagic. If the number is collected in a different or custom property, Textmagic will not automatically recognize it as the contact’s phone number.
Filter the flow on your SMS consent property so only opted-in contacts receive the message. See consent tips below.
Before you build this automation flow:
- Give each form a distinctive name. Recent conversion is populated by every HubSpot form in your account, including support and newsletter forms, and it can’t be configured to ignore any of them. The name you filter on needs to be specific enough that no other form matches it.
- Map the Recent conversion when you connect the two accounts. Properties left out of the initial mapping can’t be added later.
- Recent conversion is set when a contact submits a HubSpot form. Contacts created by import or through the API won’t have a value there unless they later submit a form.
3. Follow up when a lead becomes an MQL (Marketing qualified lead)
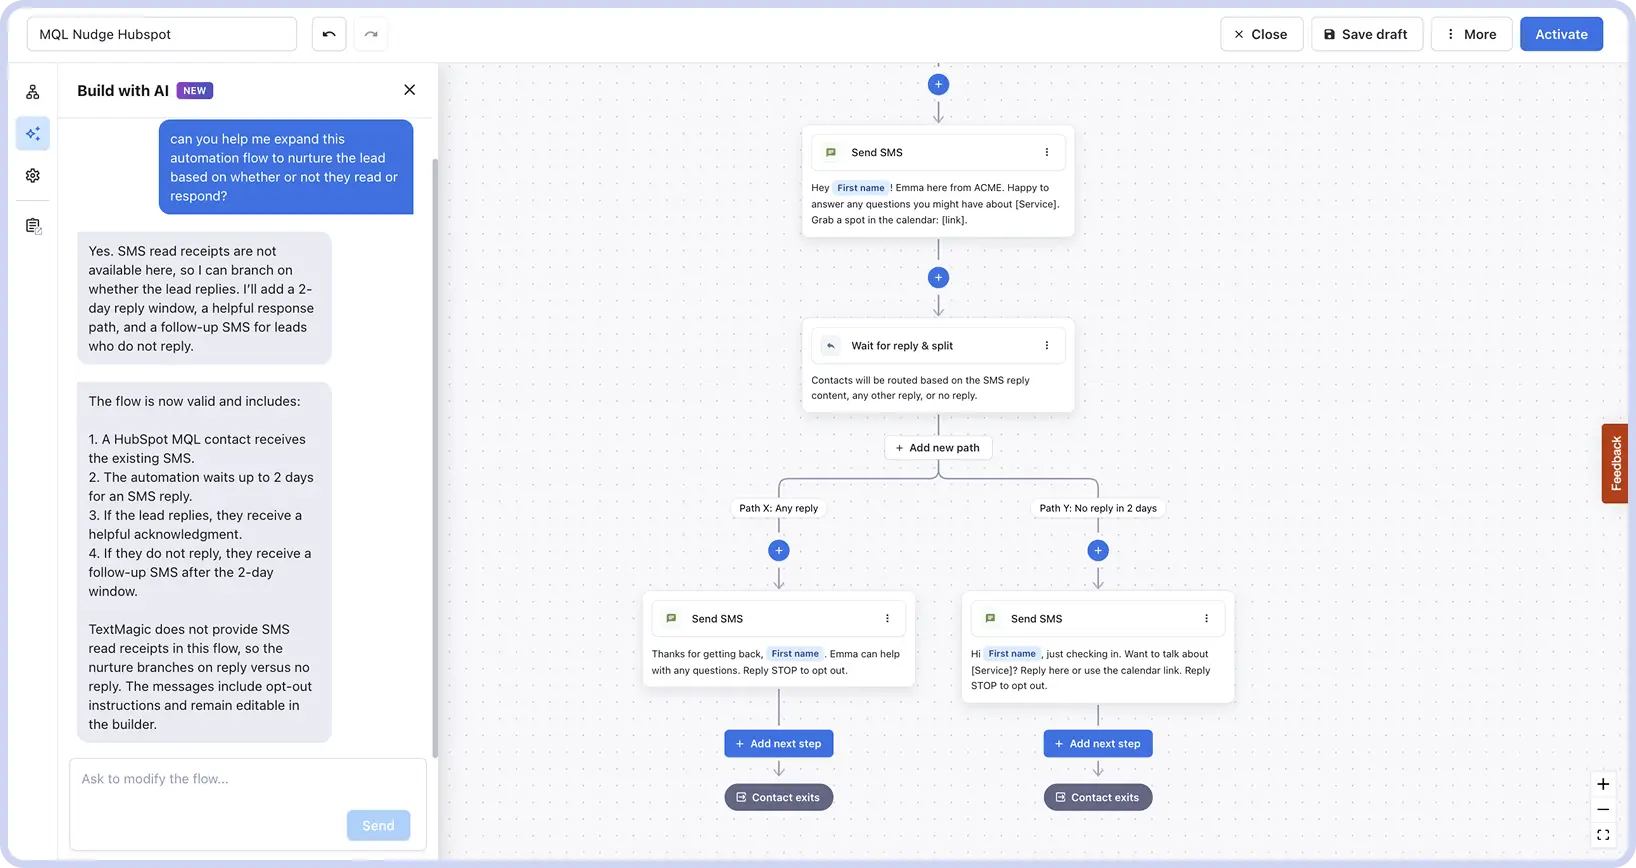
A contact moving to MQL (Marketing qualified lead) is a useful moment to change the conversation. Your team decides what qualifies a contact as an MQL in HubSpot, so once that lifecycle stage changes, you can use it to trigger the next message automatically.
That might mean sending a more relevant SMS, creating a task for the contact owner, or starting another action that moves the lead closer to a sales conversation.
- Trigger: Contact property updated
- Filter: Lifecycle stage: Marketing qualified lead
- Actions: Send SMS
- Sample message: Hi {First name}, it’s {Owner first name} at Acme. Happy to answer questions on {Company}’s setup. Grab 15 mins here: acme.co/mtg. Reply STOP to opt out.
You can build the flow manually, or describe what you want to Textmagic’s AI flow builder and let it create the automation for you. For example, you could ask it to send an SMS when a contact becomes an MQL, then create a HubSpot task if the lead needs personal follow-up.
4. Confirm and remind people about booked meetings
No-shows are expensive, and the reminder usually falls to whoever remembers. HubSpot knows when a meeting is booked, who is taking part, and how it turned out, which makes meetings one of the richest triggers in our HubSpot integration.
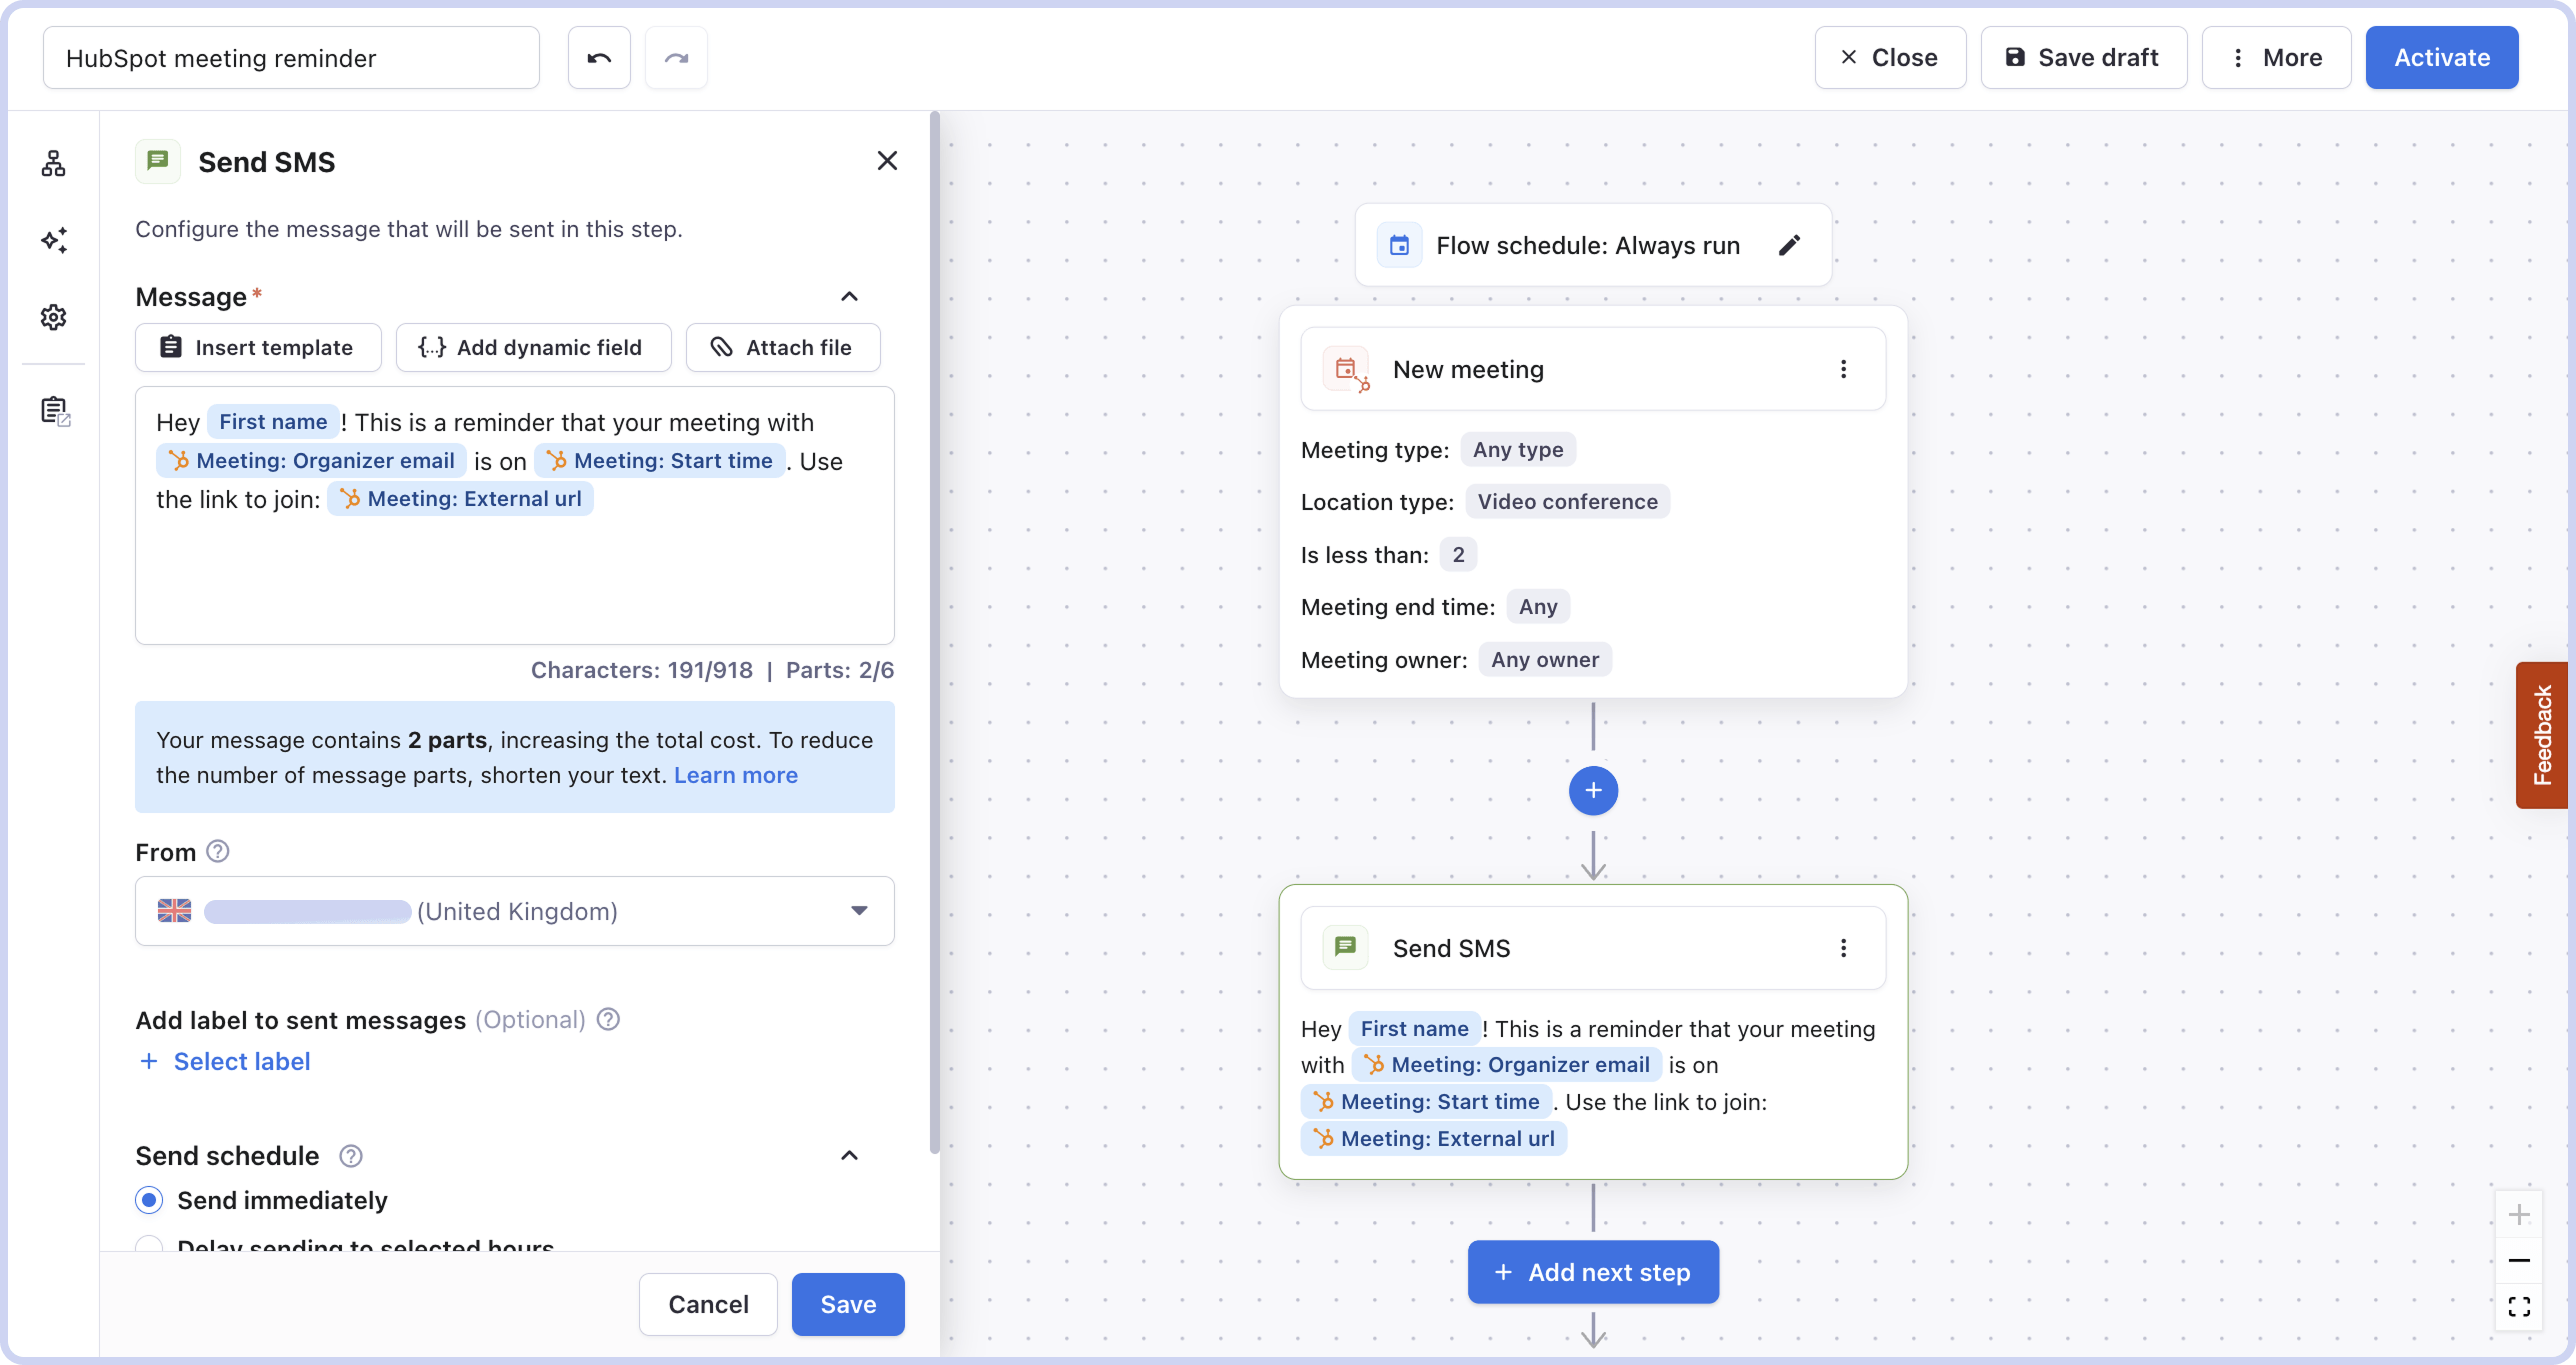
Start with the simplest version: when a meeting is booked, text the contact to confirm it.
- Trigger: New meeting
- Actions: Send SMS
- Sample message: Hi {First name}, your meeting with Acme is confirmed for {Start time}. Join here: {Video conference url}. Need to move it? Just reply. Reply STOP to opt out.
Narrow it with filters
The New meeting trigger comes with filters that keep it relevant:
- Meeting type and Location type: separate video calls from in-person visits, so the message can include a join link or an address
- Meeting start time and end time: restrict to certain hours
- Meeting owner: different messages per sales rep
- More HubSpot filters: add any other meeting property that is relevant
What else you can build on meetings
Meetings carry an unusually deep set of dynamic fields (title, start and end time, timezone, location, join link, recording URL, organiser and attendee emails, outcome, meeting source, and more). That opens up a lot:
- A reminder before the meeting. Add a wait step after the confirmation so the contact gets a nudge closer to the time.
- Reschedule notices. Use Meeting property updated, watching the start time, so anyone whose meeting moves hears about it straight away.
- After the meeting. Send a summary, the recording link, or the agreed next step while the conversation is still fresh.
- Internal follow-through. Pair any of these with Create new task or Add note to contact so the record reflects what was sent.
5. Text customers when the deal moves forward
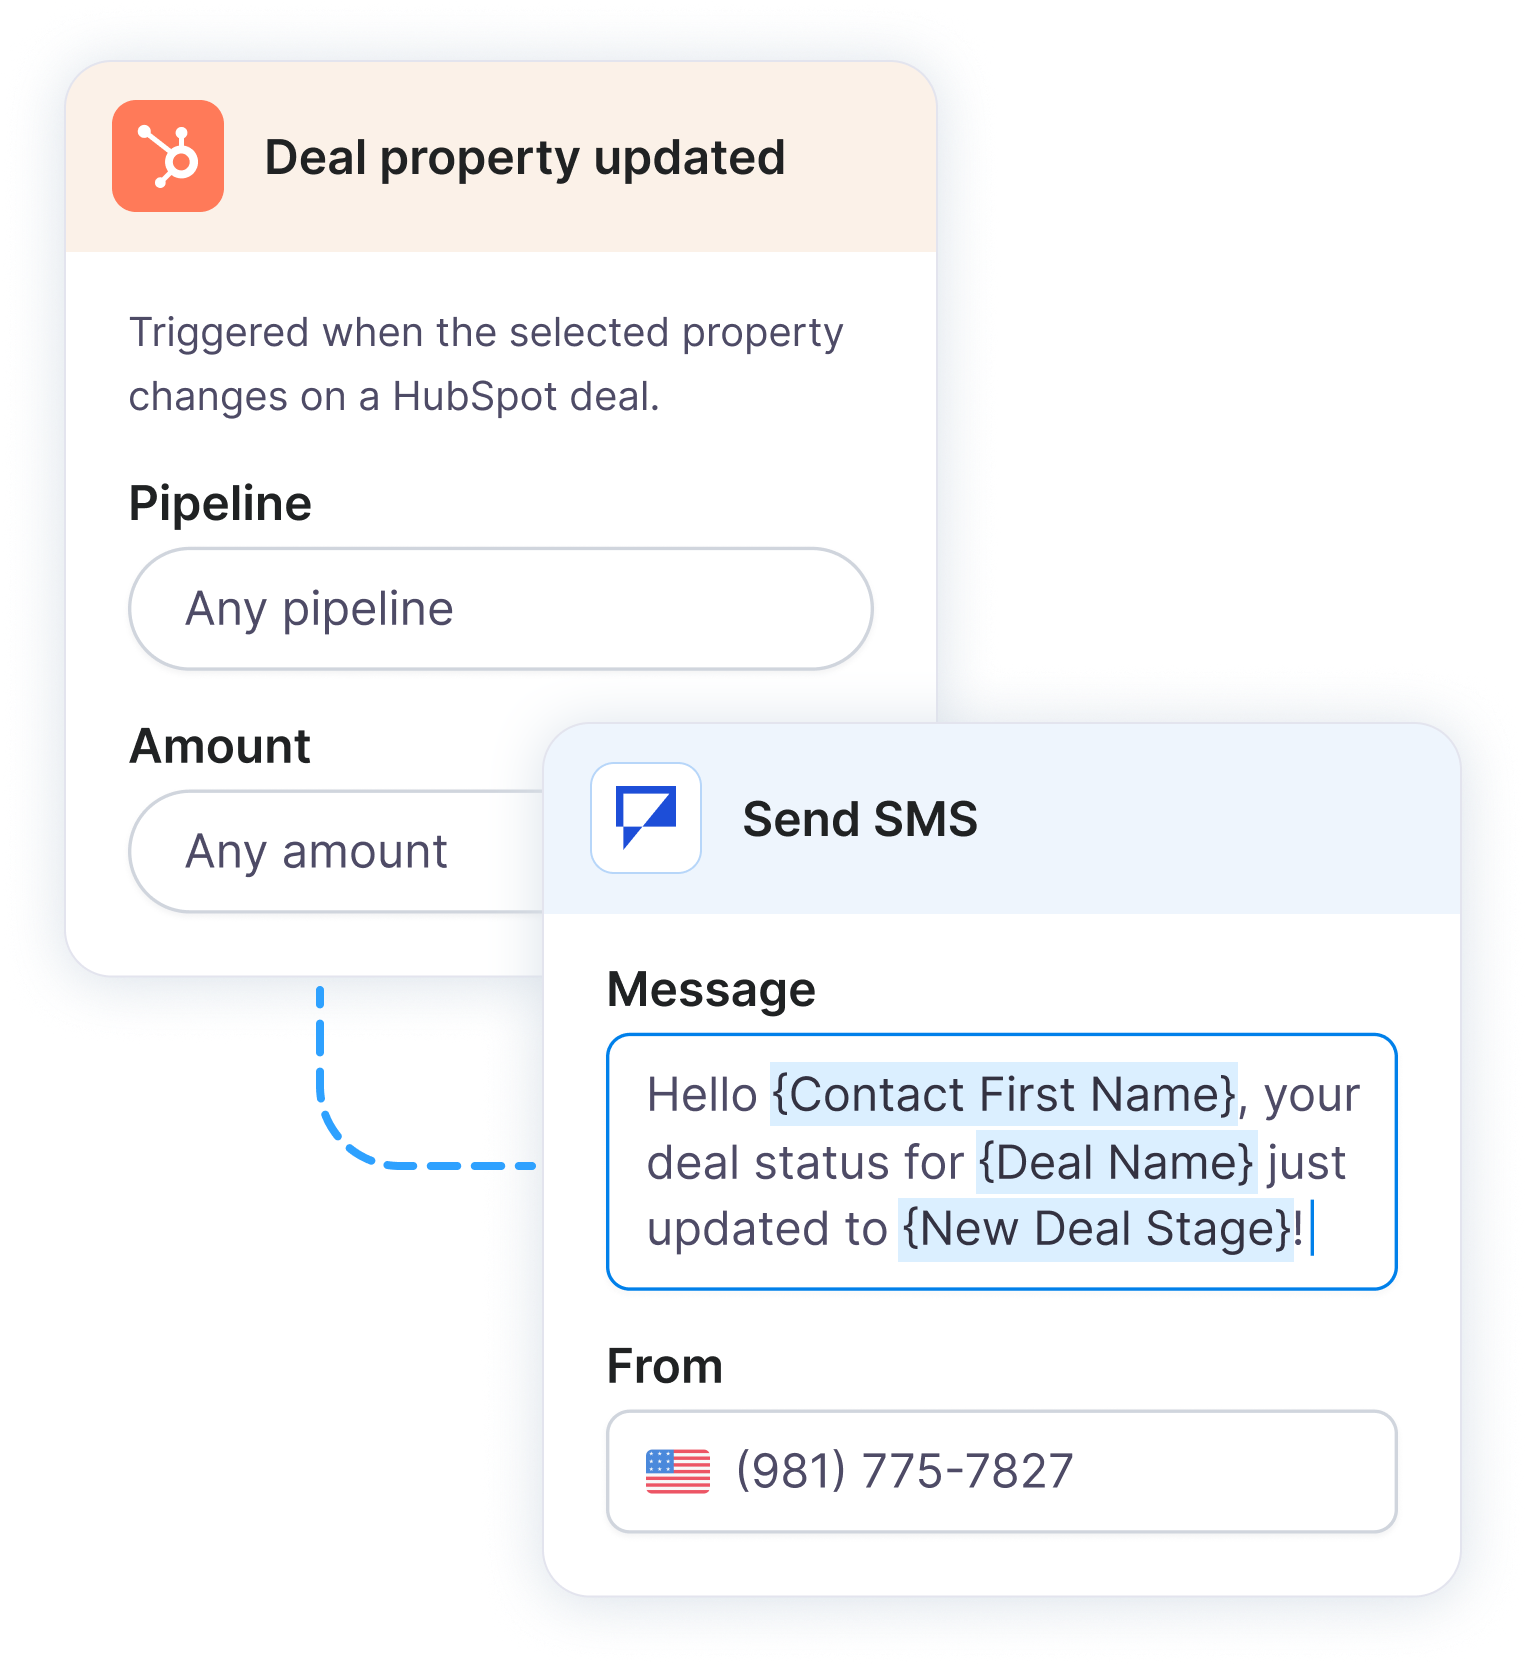
Deal stages are useful for tracking progress internally, but some stage changes are worth communicating to the customer too.
When a proposal is sent, a demo is booked, or another customer-facing milestone is reached, use that deal-stage change to trigger the next message automatically. You can also add a note to the deal so your team can see what was sent.
- Trigger: Deal property updated
- Filter: Deal stage: [relevant stage]
- Actions: Send SMS → Add note to deal
- Sample message: Hi {First name}, our team has just sent the contract to you via {Email}. If you have any questions don’t hesitate to reach out! {Company name}
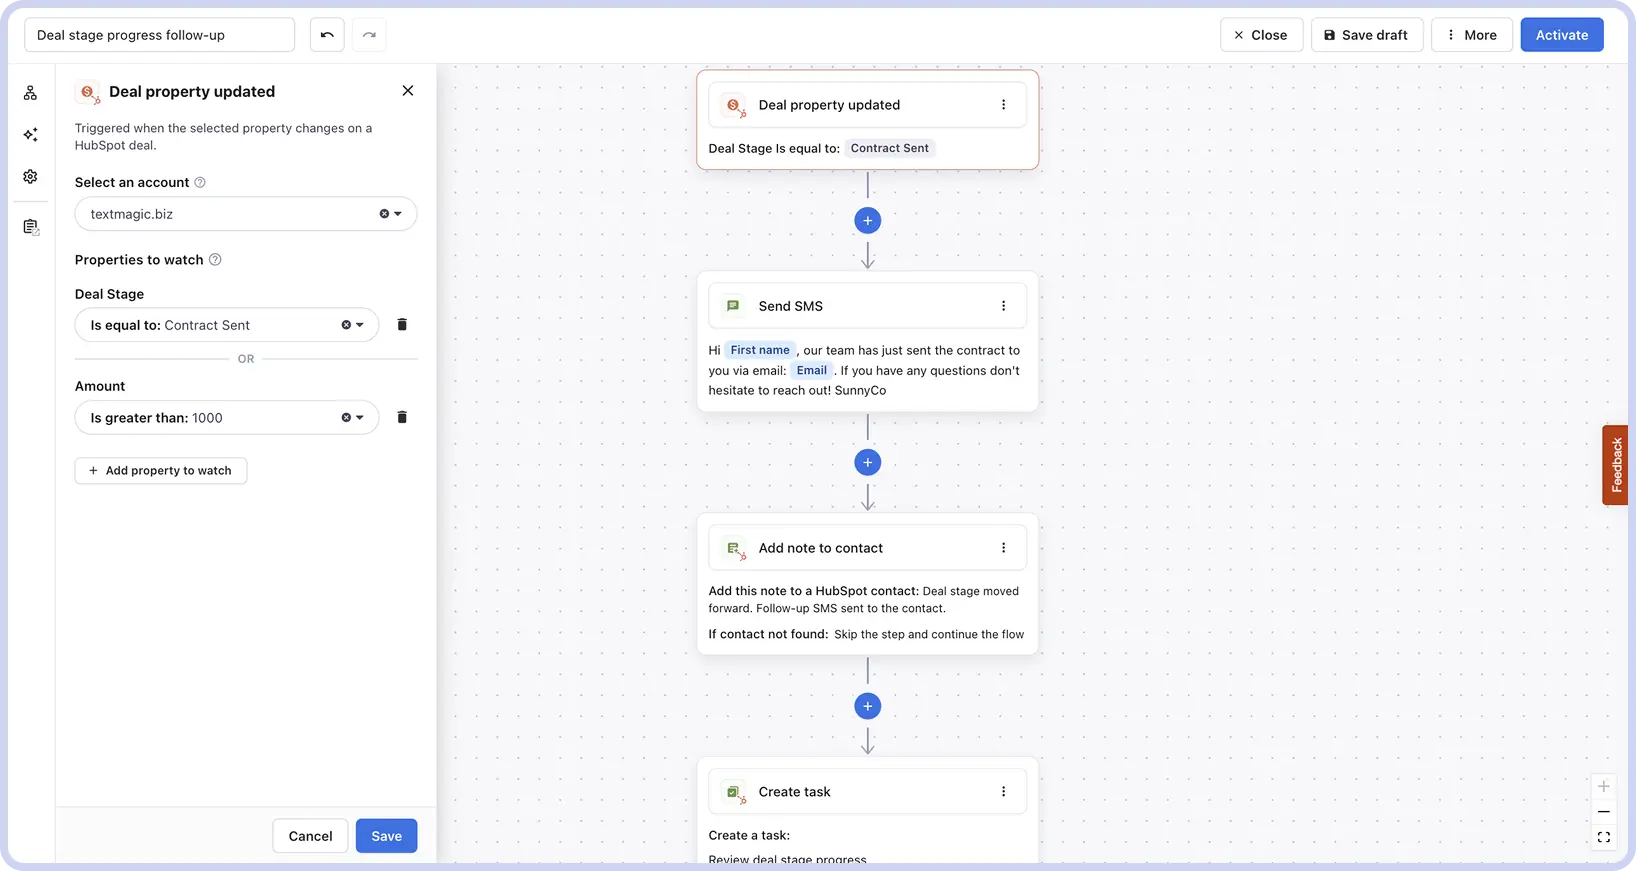
The filter is what keeps this automation useful. Avoid triggering it on every deal update; choose only the stages where the customer actually needs to hear from you.
6. Turn SMS replies into HubSpot deals, tickets, or tasks
Most HubSpot automations start with something happening in the CRM. This one works the other way around.
When a customer replies by SMS, Textmagic can use that message to create work in HubSpot. A support question can become a ticket, a buying signal can become a deal, and a request that needs follow-up can become a task.
- Trigger: New inbound SMS is received
- Actions: Create new ticket, Create new deal, or Create new task
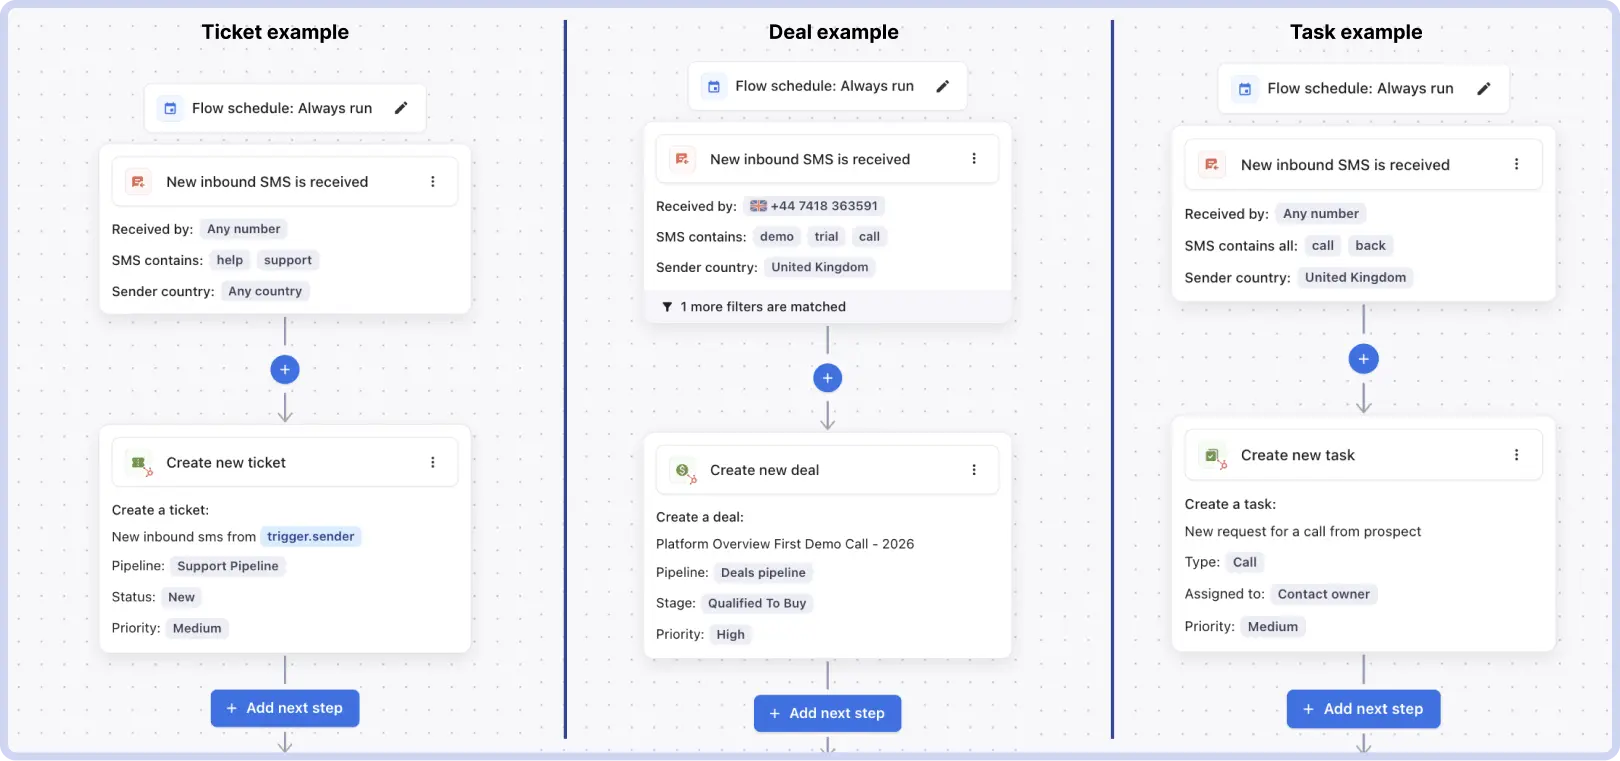
Here are all the options available for each action type:
- Create a new ticket. Set the ticket status, priority, and owner, then add a description so your team has the context it needs.
- Create a new deal. Choose the pipeline and deal stage, assign an owner and priority, and use dynamic fields from the contact record to build the deal name.
- Create a new task. Set the task title, type, priority, owner, due date, and description. You can also use dynamic fields in the title to make the task easier to identify.
You can narrow these automations further by filtering inbound messages by sender country, receiving number, or message content. You can also let the customer know you’re on it by adding a short follow-up after creating your Ticket, Deal, or Task:
Sample message: Thanks {First name}, we’ve logged this and someone from Acme will be in touch shortly.
7. Send onboarding texts when the deal is won
Closing a deal shouldn’t create a gap in communication. Use the Closed won stage to start onboarding automatically with a welcome text, a short sequence, or a combination of SMS and email.
- Trigger: Deal property updated
- Filter: Deal stage: Closed won
- Actions: Send SMS → Wait → Send SMS or email
- Sample message: Hi {First name}, welcome to Acme! {Owner first name} will reach out today to book your onboarding. Reply here if anything’s urgent.
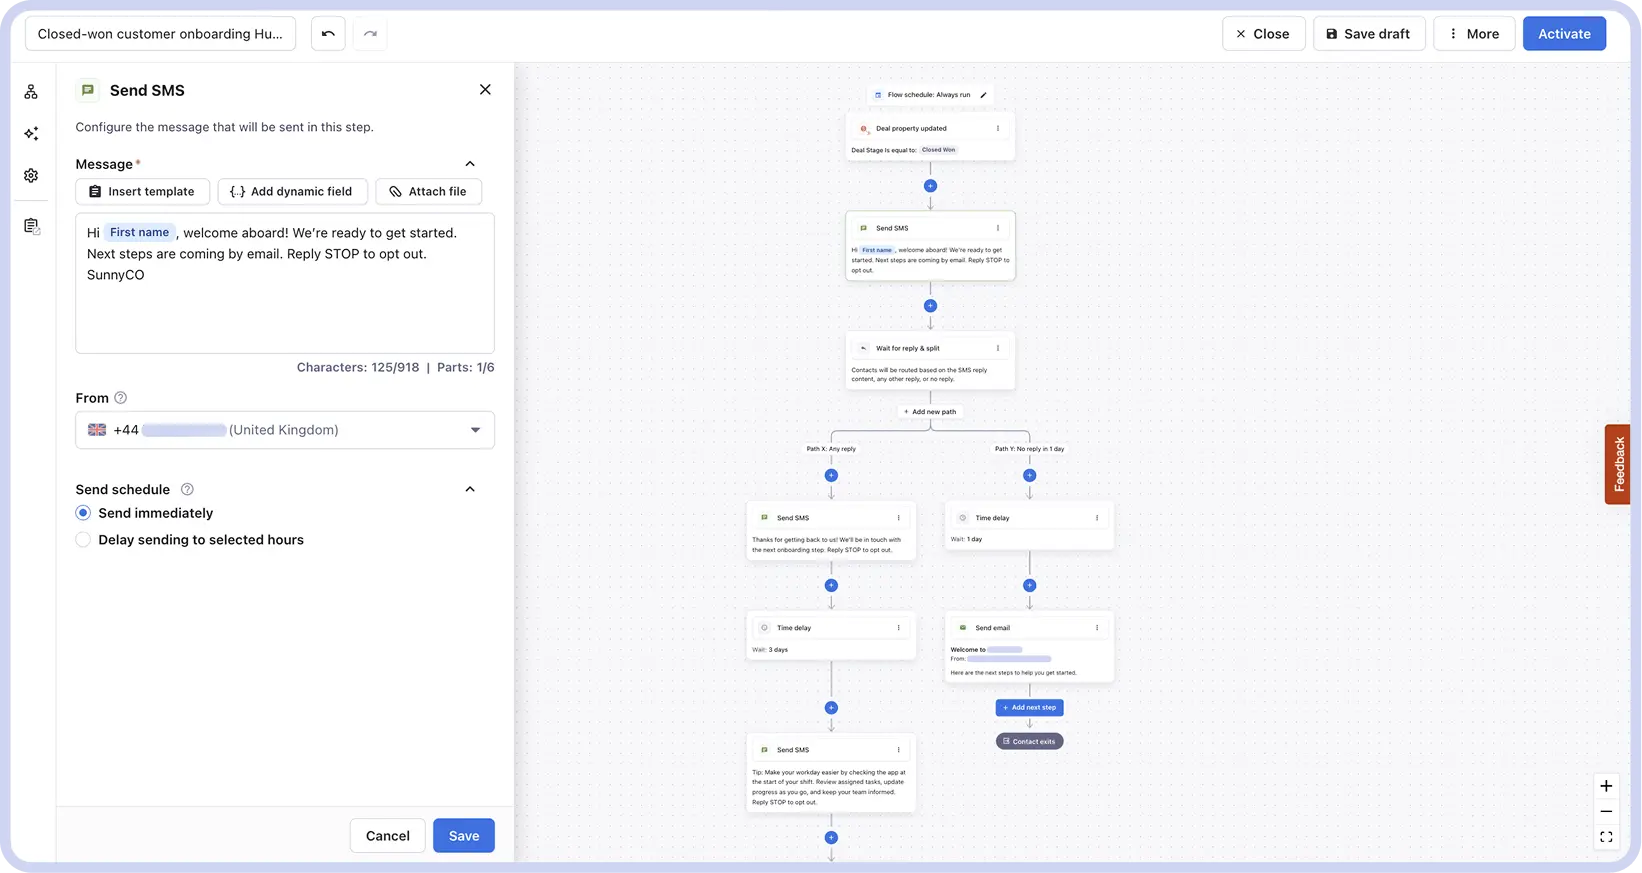
There are several ways to make the onboarding sequence more useful. You can start with one of Textmagic’s templates or use the AI flow builder, then adapt it to your customer journey:
- Space messages out over the first week. Build a short sequence of two or three SMS or email messages and add delays between them so customers are not getting everything at once.
- Personalize the sequence using CRM data. Capture preferences during the sales process, sync those fields from HubSpot to Textmagic, and use them to tailor the onboarding flow. Conditional splits can send customers down different paths based on those preferences without requiring separate automations.
- Treat replies as a signal to involve a person. Use Wait for reply & split to branch the flow when a customer responds. You can assign the contact to a sales rep, create a follow-up step, or move them into a more personalized sequence.
8. Advanced: Send renewal reminders from a custom HubSpot property
Your automations don’t have to rely only on HubSpot’s standard contact properties. Any custom property you map to Textmagic can trigger a flow when its value changes, which makes fields you already manage in HubSpot usable for customer messaging.
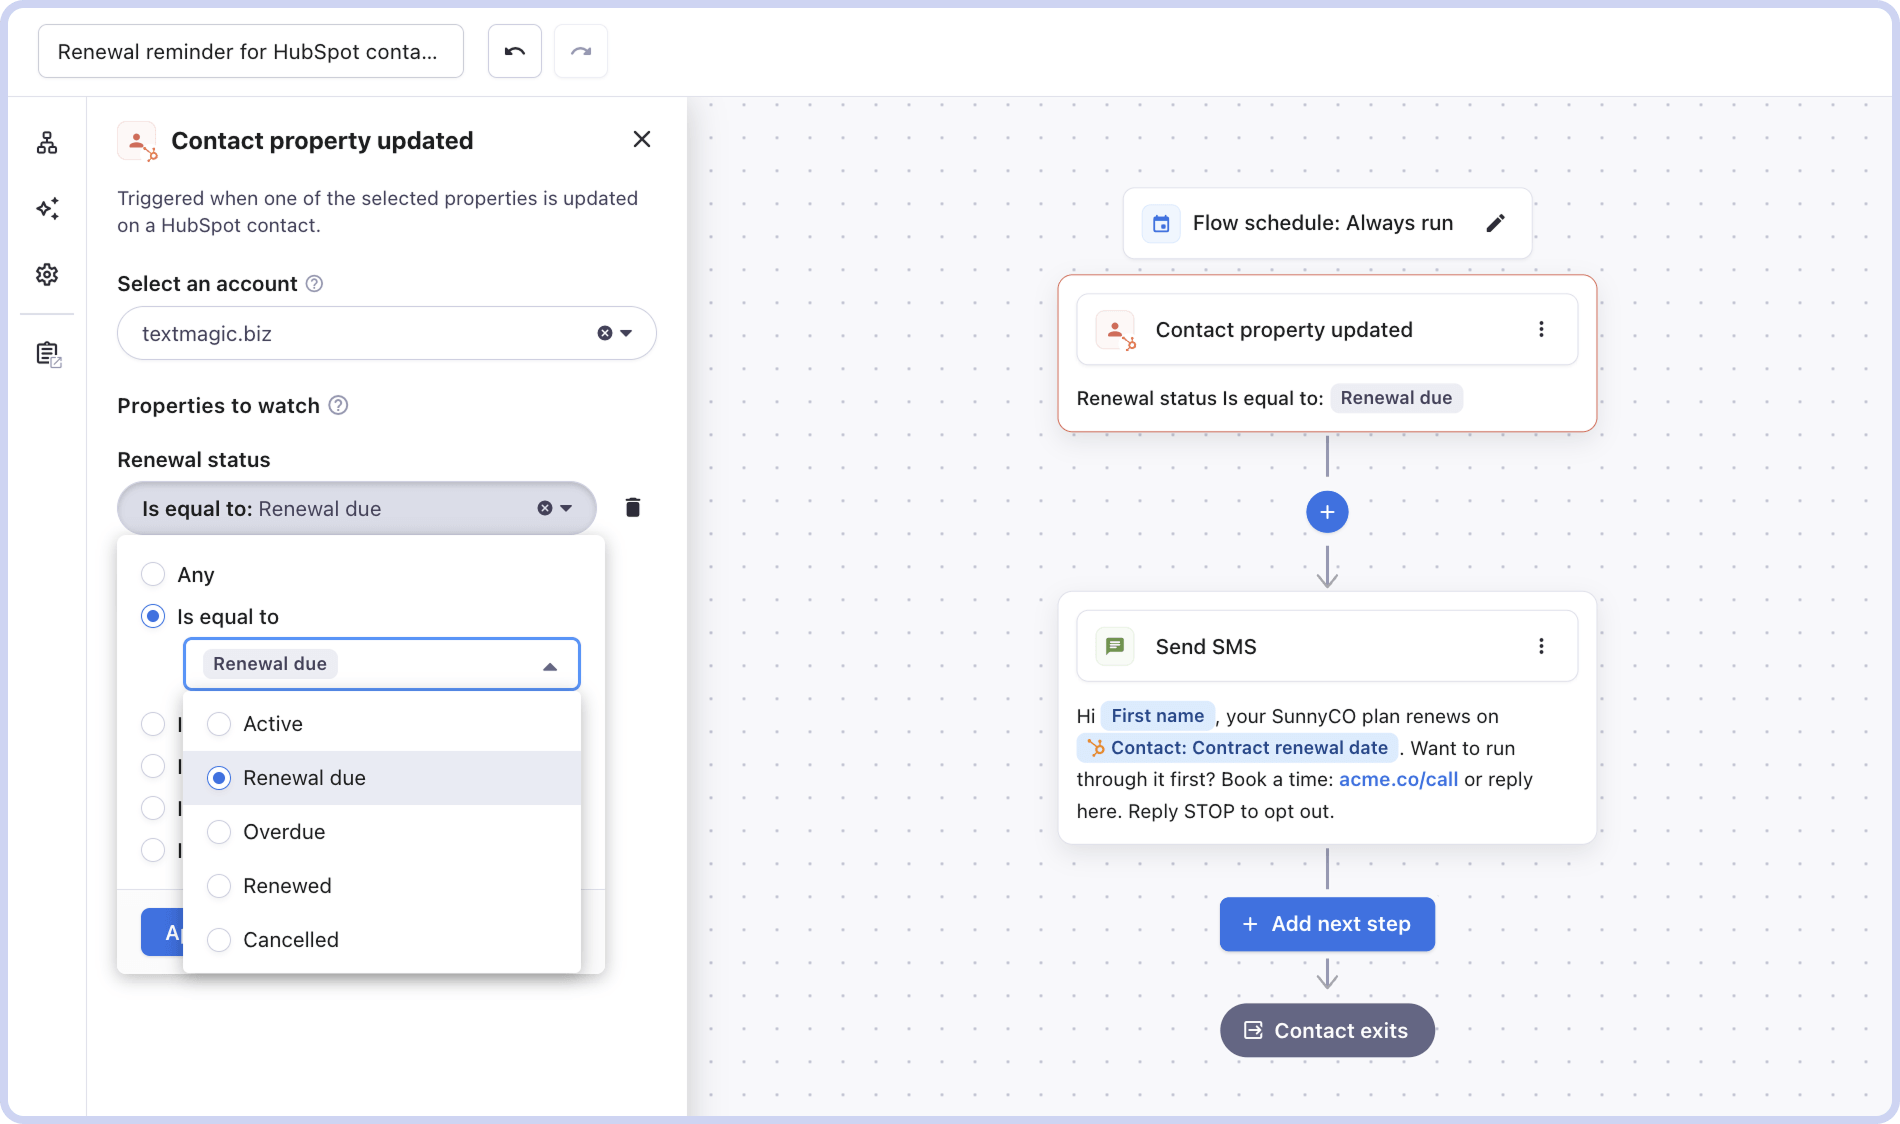
Renewals are a good example. A dropdown select property such as Renewal status moves to Renewal due, Textmagic picks up the change, and the reminder sends itself.
One thing to understand first: a date property on its own can’t start a flow. Textmagic’s trigger watches for a property changing. That’s why you need to assign a status to the renewal.
Step 1: Create custom properties in HubSpot
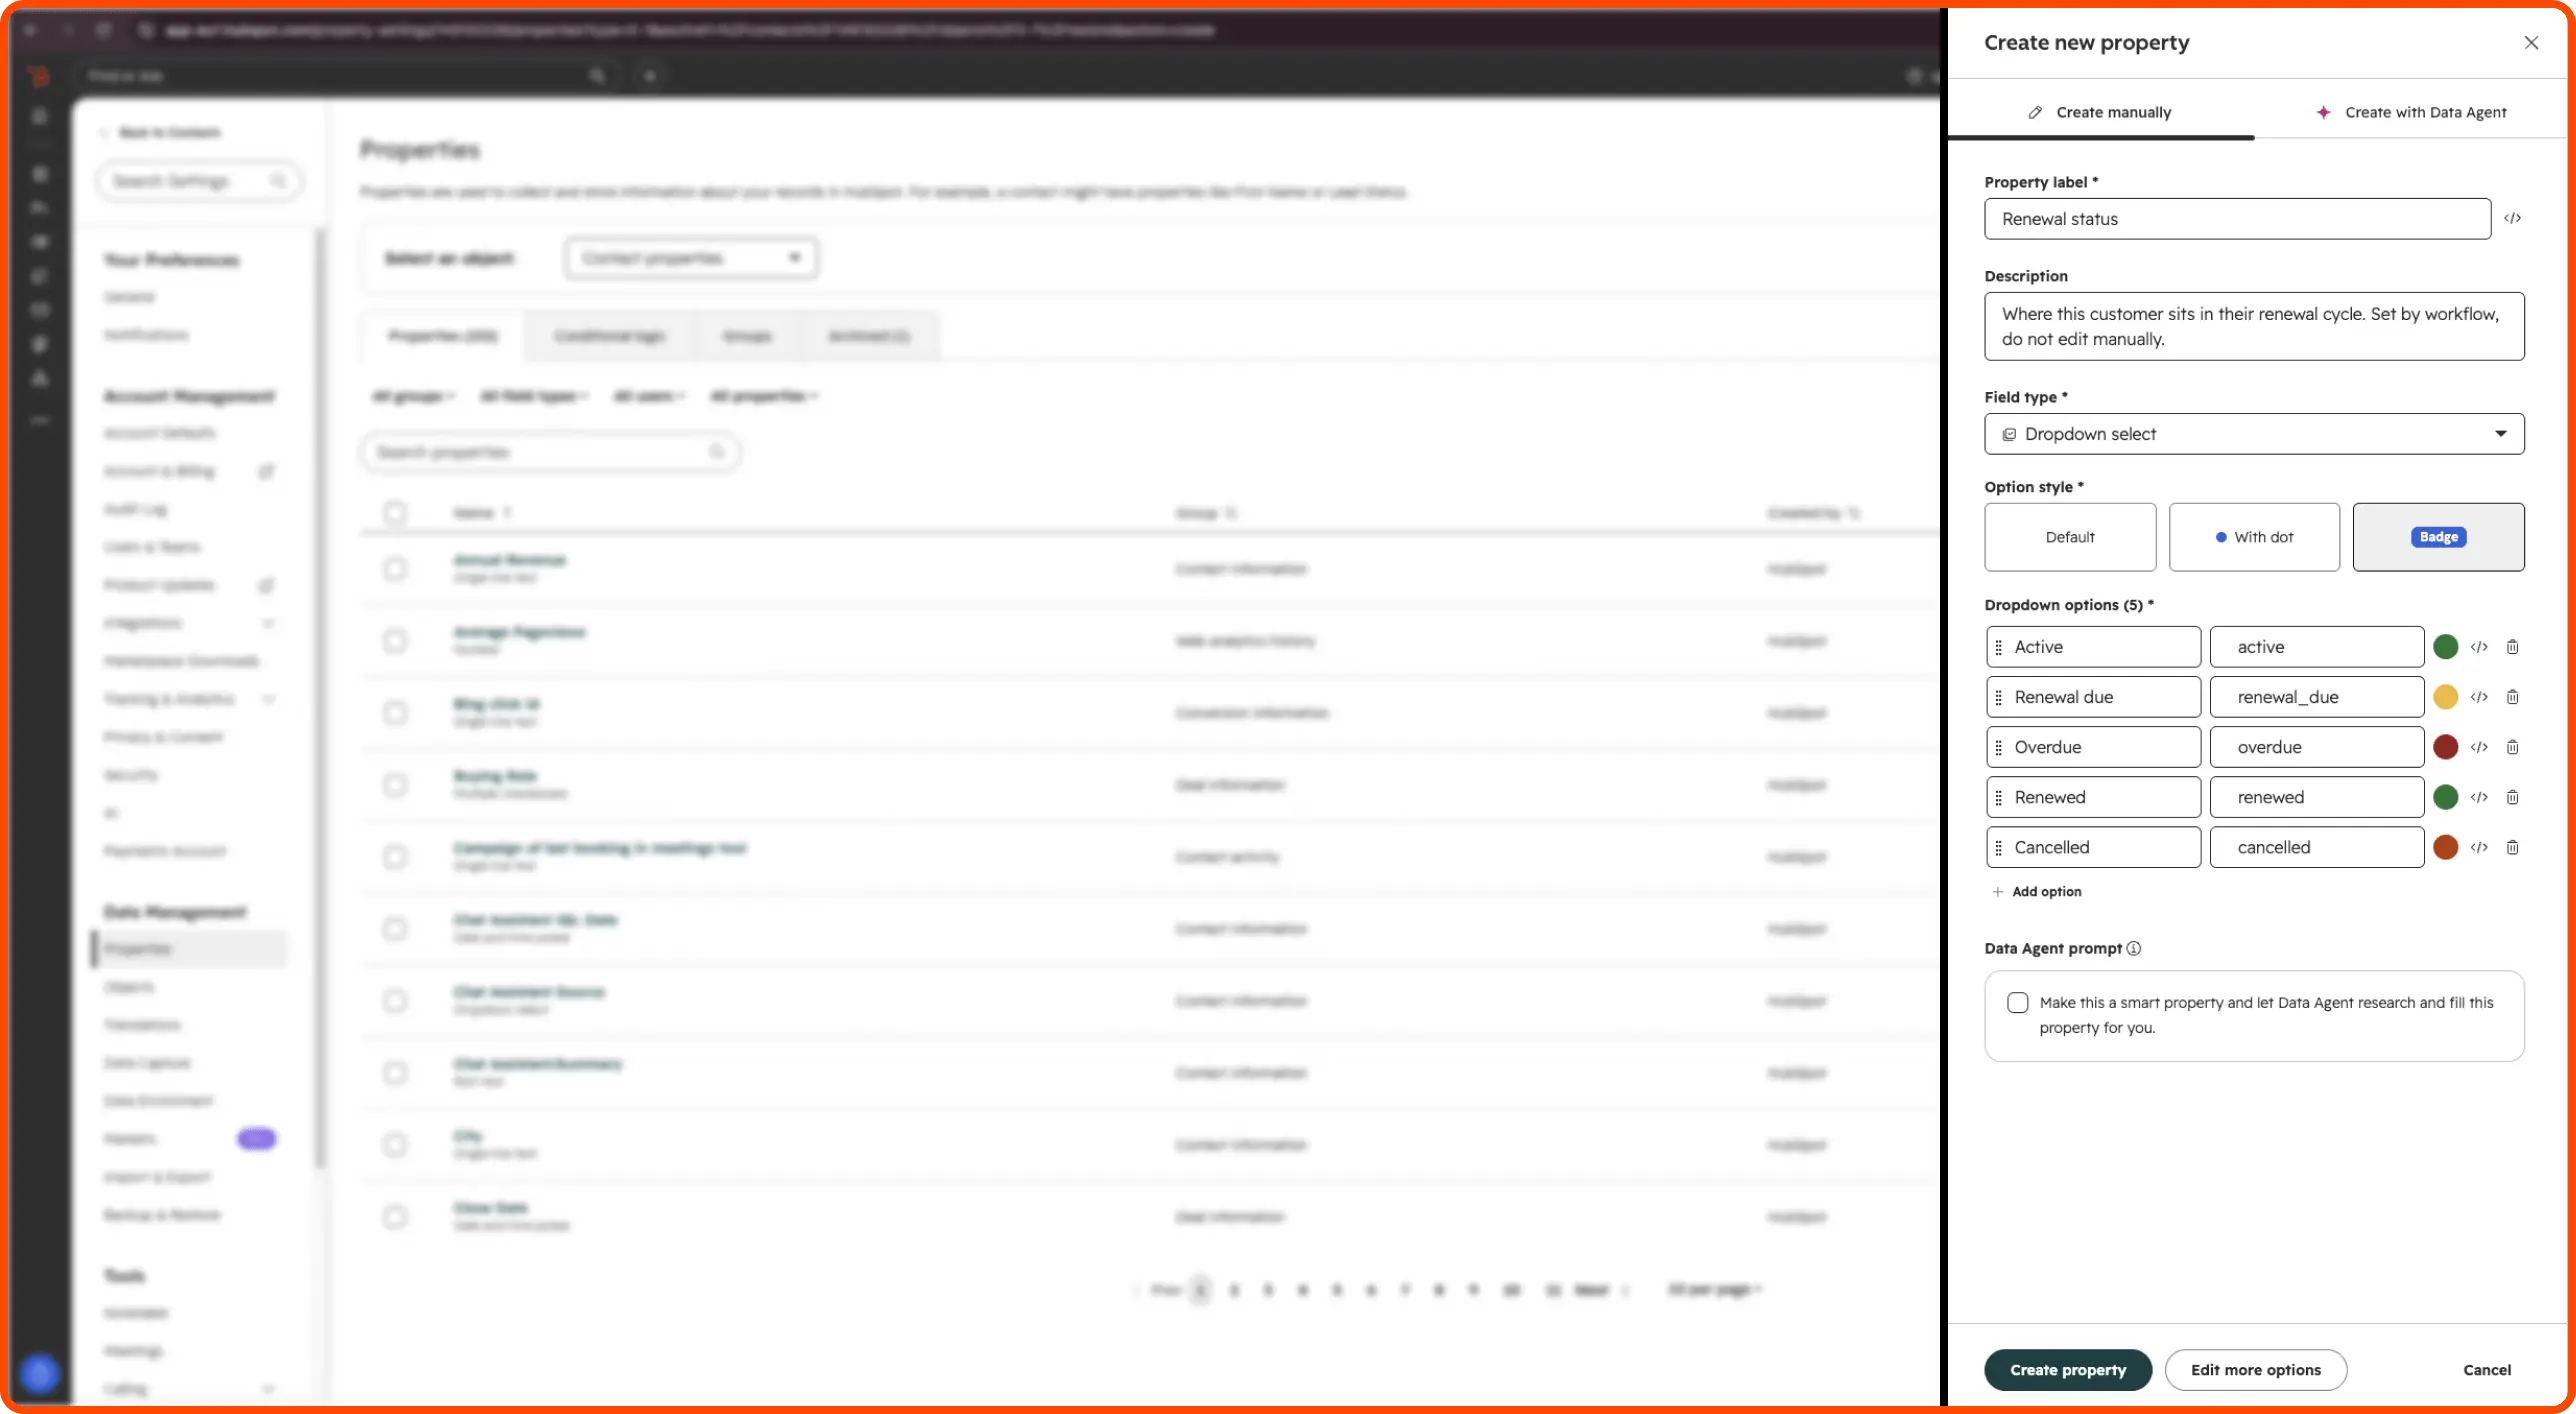
1. The Renewal status property (required). This is what Textmagic watches.
- Go to Settings → Properties → Create property
- Object type: Contact, Property label: Renewal status, Field type: Dropdown select
- Add your options: Active, Renewal due, Overdue, Renewed, Cancelled
- Check the internal values HubSpot generates for each option using the </> icon. These are what integrations read.
2. A Renewal date property. If a HubSpot workflow is going to work out when a renewal is approaching, it needs a date to enroll on. Create a second property with the field type Date picker, called something like Contract renewal date. If your billing system or an import sets the status instead, you can skip this step.
Check your existing properties first: you may already have a renewal date field. Some HubSpot-managed date properties are read-only, which is fine for a workflow to enroll on but means your team can’t correct the value by hand.
Get the field types right the first time. Some HubSpot property types can’t be converted cleanly later, so choose the field type carefully when you create the property.
Finally, include both properties in your field mapping so they’re available in Textmagic.
Step 2: Build the flow in Textmagic
Now it’s time to build your Textmagic flow.
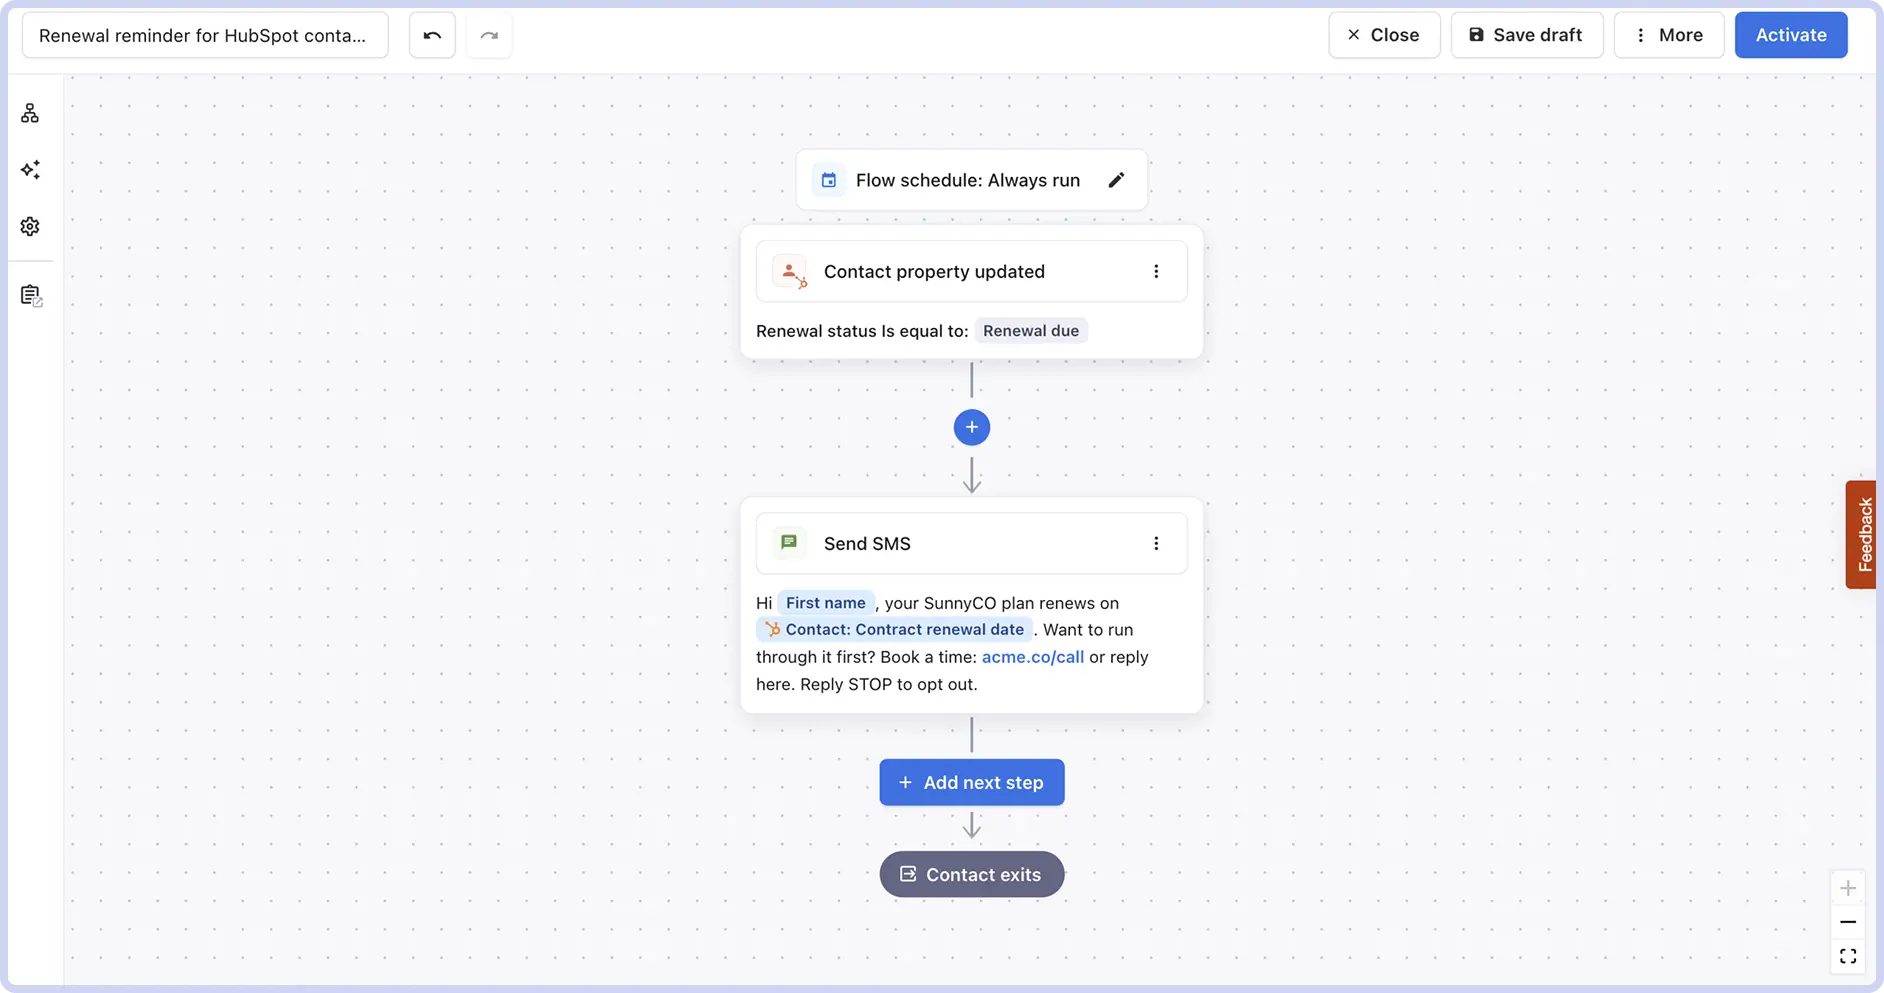
- Create a new automation flow and choose Contact property updated as the trigger
- Select your HubSpot account
- Under Properties to watch, select Renewal status, set the condition to Is equal to, and choose Renewal due
- Click Add next step and choose Send SMS
- Write your message, using Add dynamic field to insert the contact’s first name and renewal date
- Set the flow schedule so messages only go out during reasonable hours rather than Always run. Test and turn the flow on.
Step 3: Decide what updates the status
The flow is only as reliable as whatever sets the status:
- A HubSpot workflow. The cleanest automated option if you have a paid HubSpot plan. Walkthrough below.
- Your billing system. If subscriptions live in Stripe or a similar tool that already syncs with HubSpot, let that system write the status.
- An import. Updating the property in bulk works on any HubSpot plan and suits teams that review renewals on a schedule.
- Manually. Practical for a small book of accounts, less so as the list grows.
Automating it with a HubSpot workflow
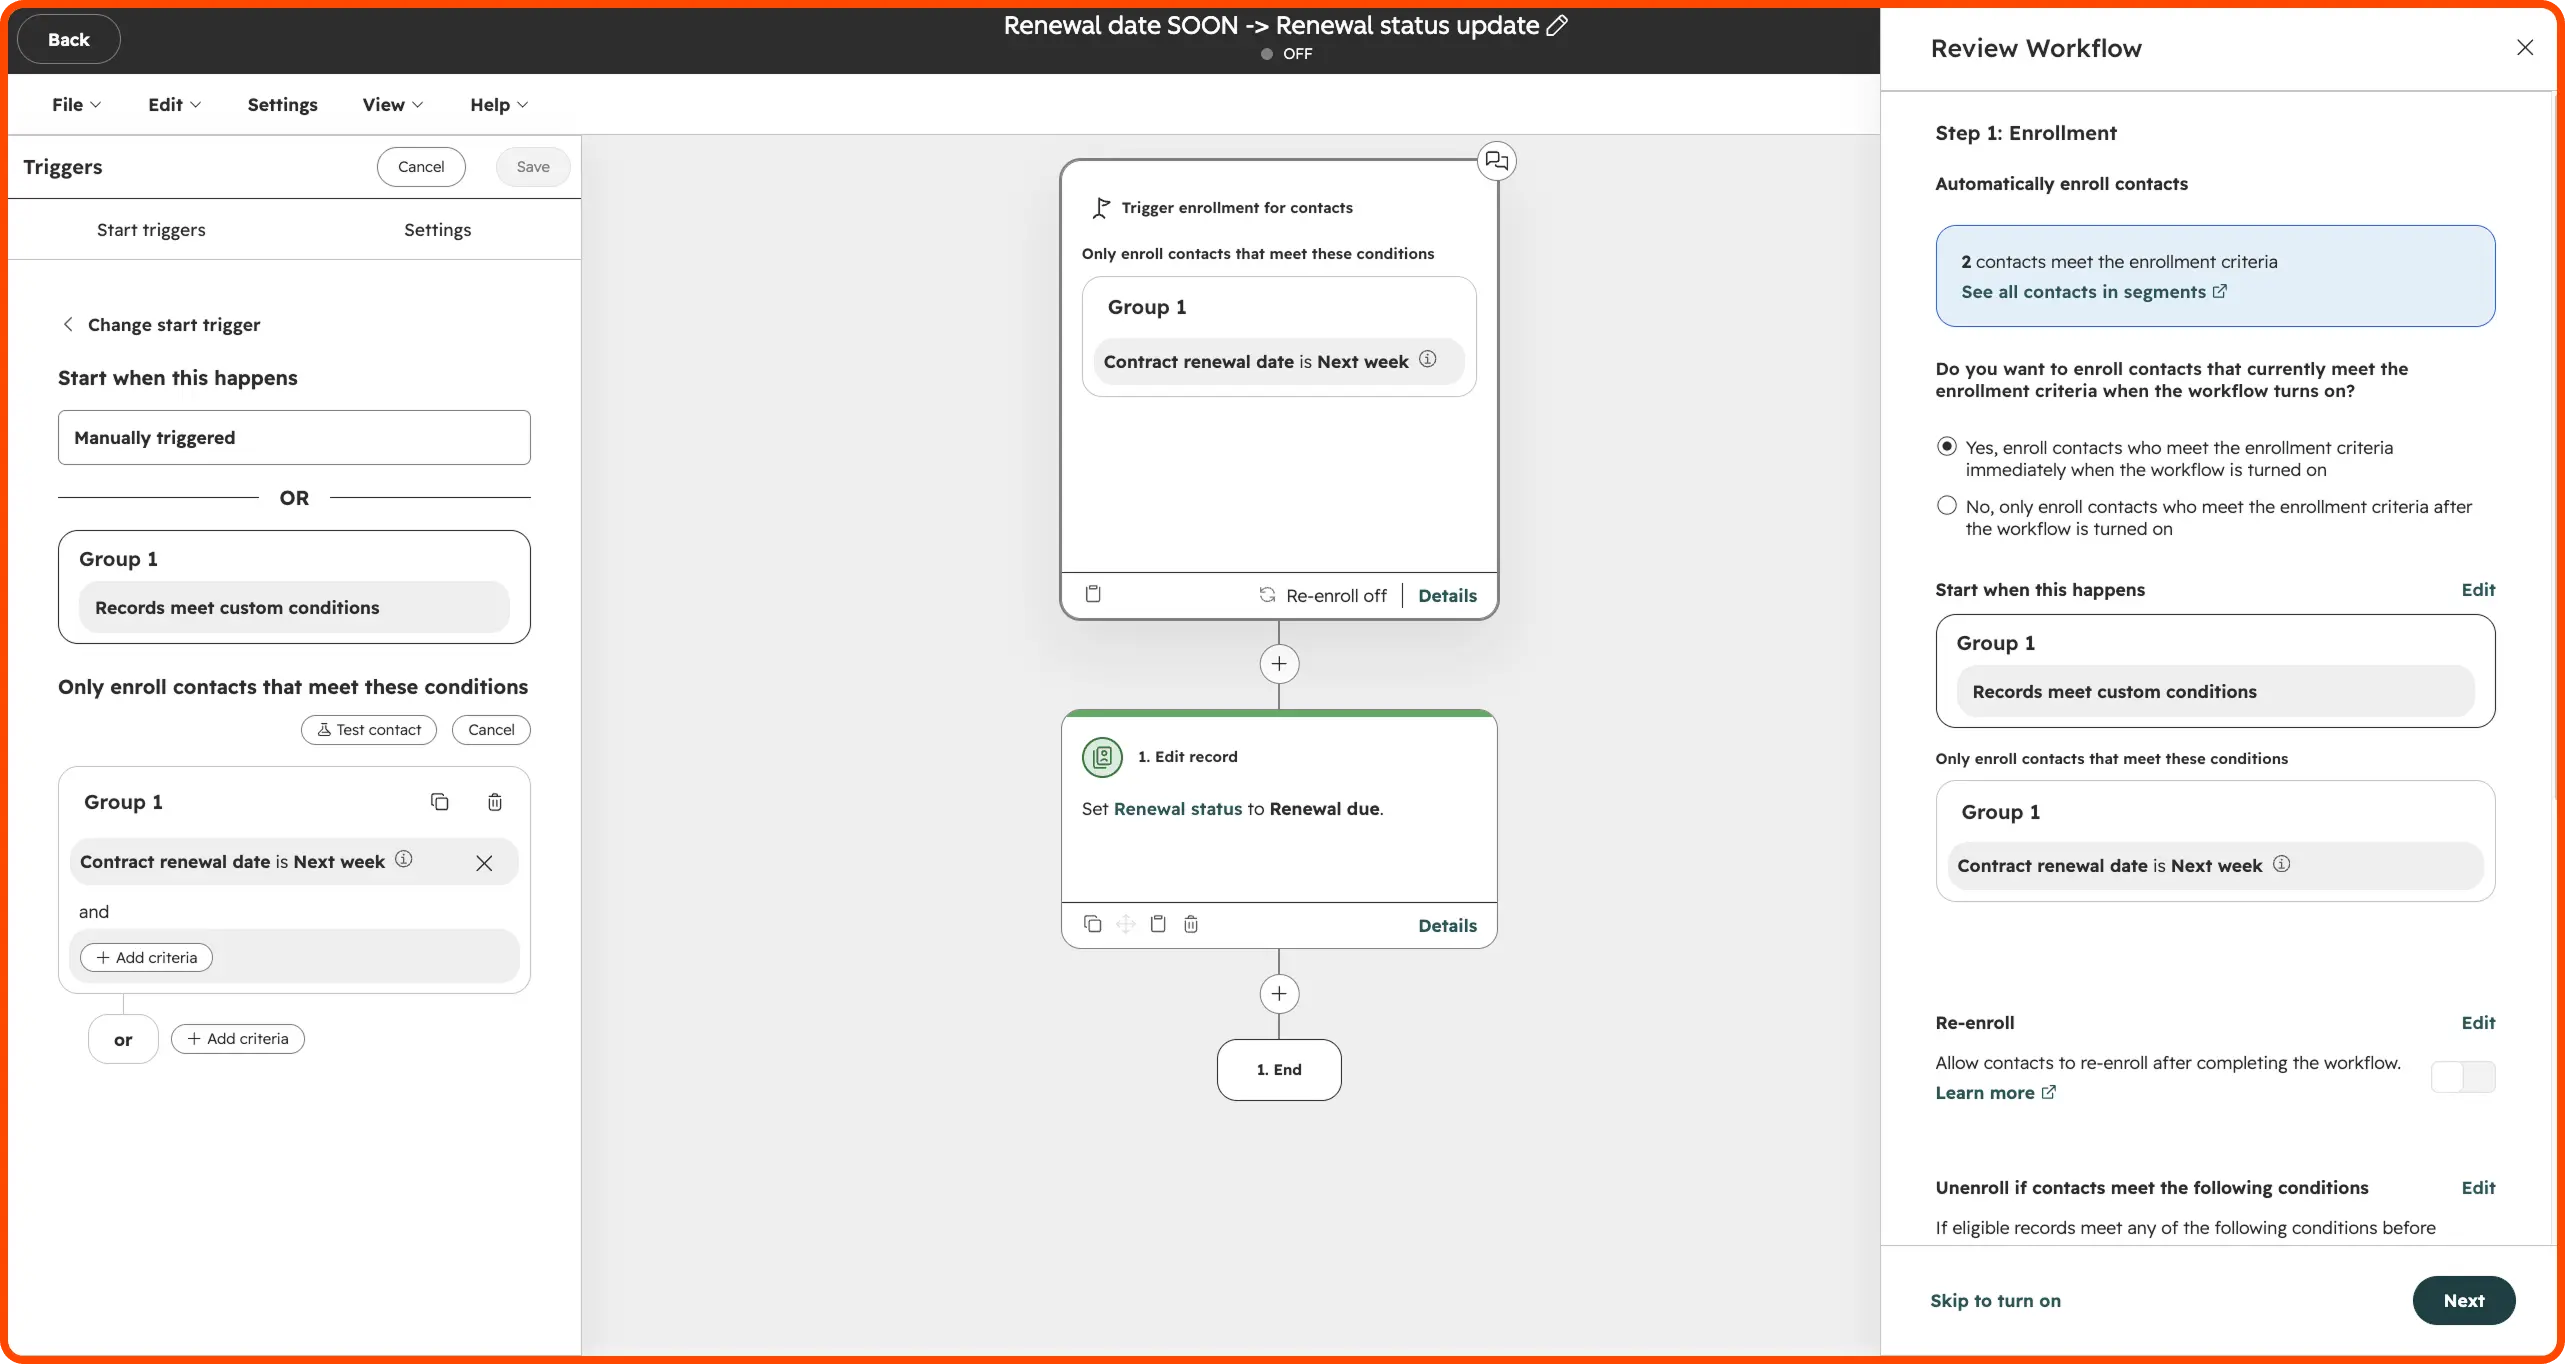
- Go to Automation → Workflows → Create workflow → From scratch
- Choose Met filter criteria as the trigger type. Depending on your HubSpot version, this may appear as Met filter criteria or under Data values
- Set the object to Contact
- Add the condition: Contract renewal date is Next week (or whichever window suits your renewal cycle)
- Click Next, then add an action: CRM → Set property value
- Set Renewal status to Renewal due
- On the review screen, check how many contacts meet the criteria, then select Yes, enrol contacts who meet the criteria immediately. Turn the workflow on
Adapt this logic to other custom properties
The same pattern works for any business-specific status you already track in HubSpot, like contract stage, subscription tier, onboarding progress, etc. Update the mapped property in HubSpot, and use that change to start the matching Textmagic flow.
You can also add a HubSpot task as a next action, so the account owner has a follow-up waiting at the same time the reminder goes out.
9. Acknowledge high-priority tickets automatically
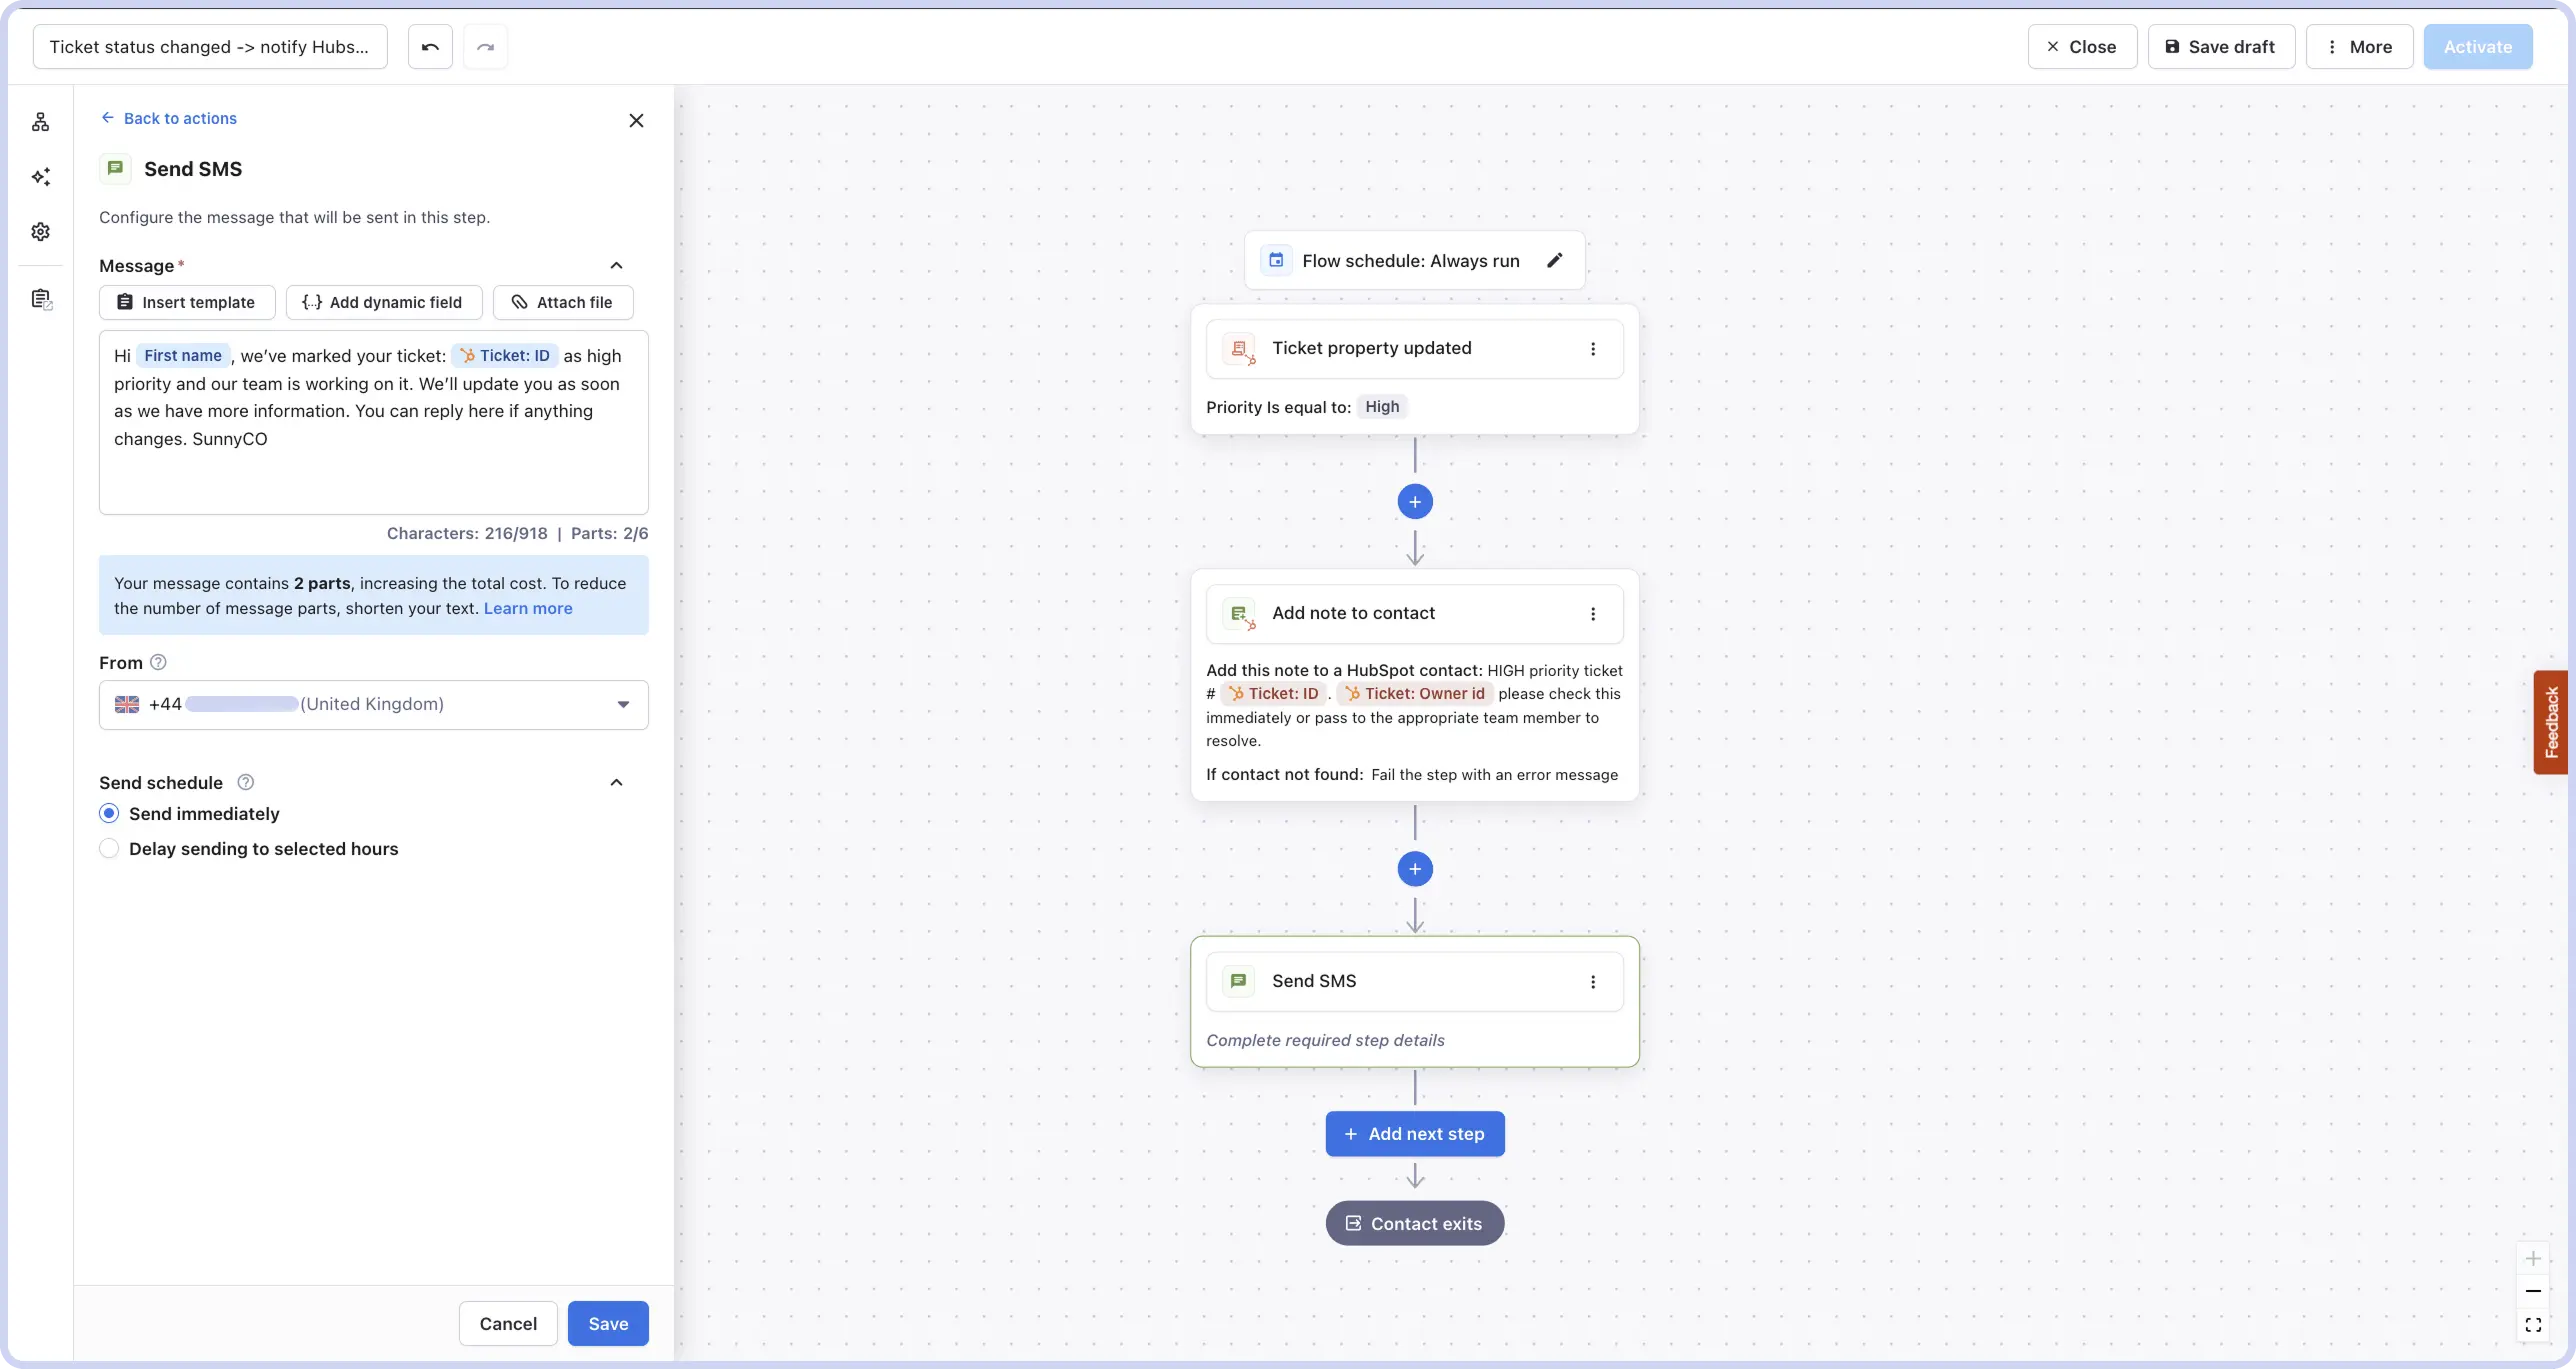
A high-priority ticket should feel different to the customer, not just to your support team. When a ticket is marked as high priority, send a quick acknowledgement so the customer knows the issue has been recognized and is being handled.
- Trigger: Ticket property updated
- Filter: Priority: High
- Actions: Add note to contact -> Send SMS
- Sample message: Hi {First name}, we’ve marked ticket #{Ticket ID} as high priority and our team is working on it. We’ll update you as soon as we have more information. You can reply here if anything changes.
Automations send messages to the contact who triggered the flow, so internal alerts go into HubSpot as tasks and notes rather than as texts to your team.
10. Request feedback after a ticket closes
The best time to ask about a support experience is while the interaction is still fresh.
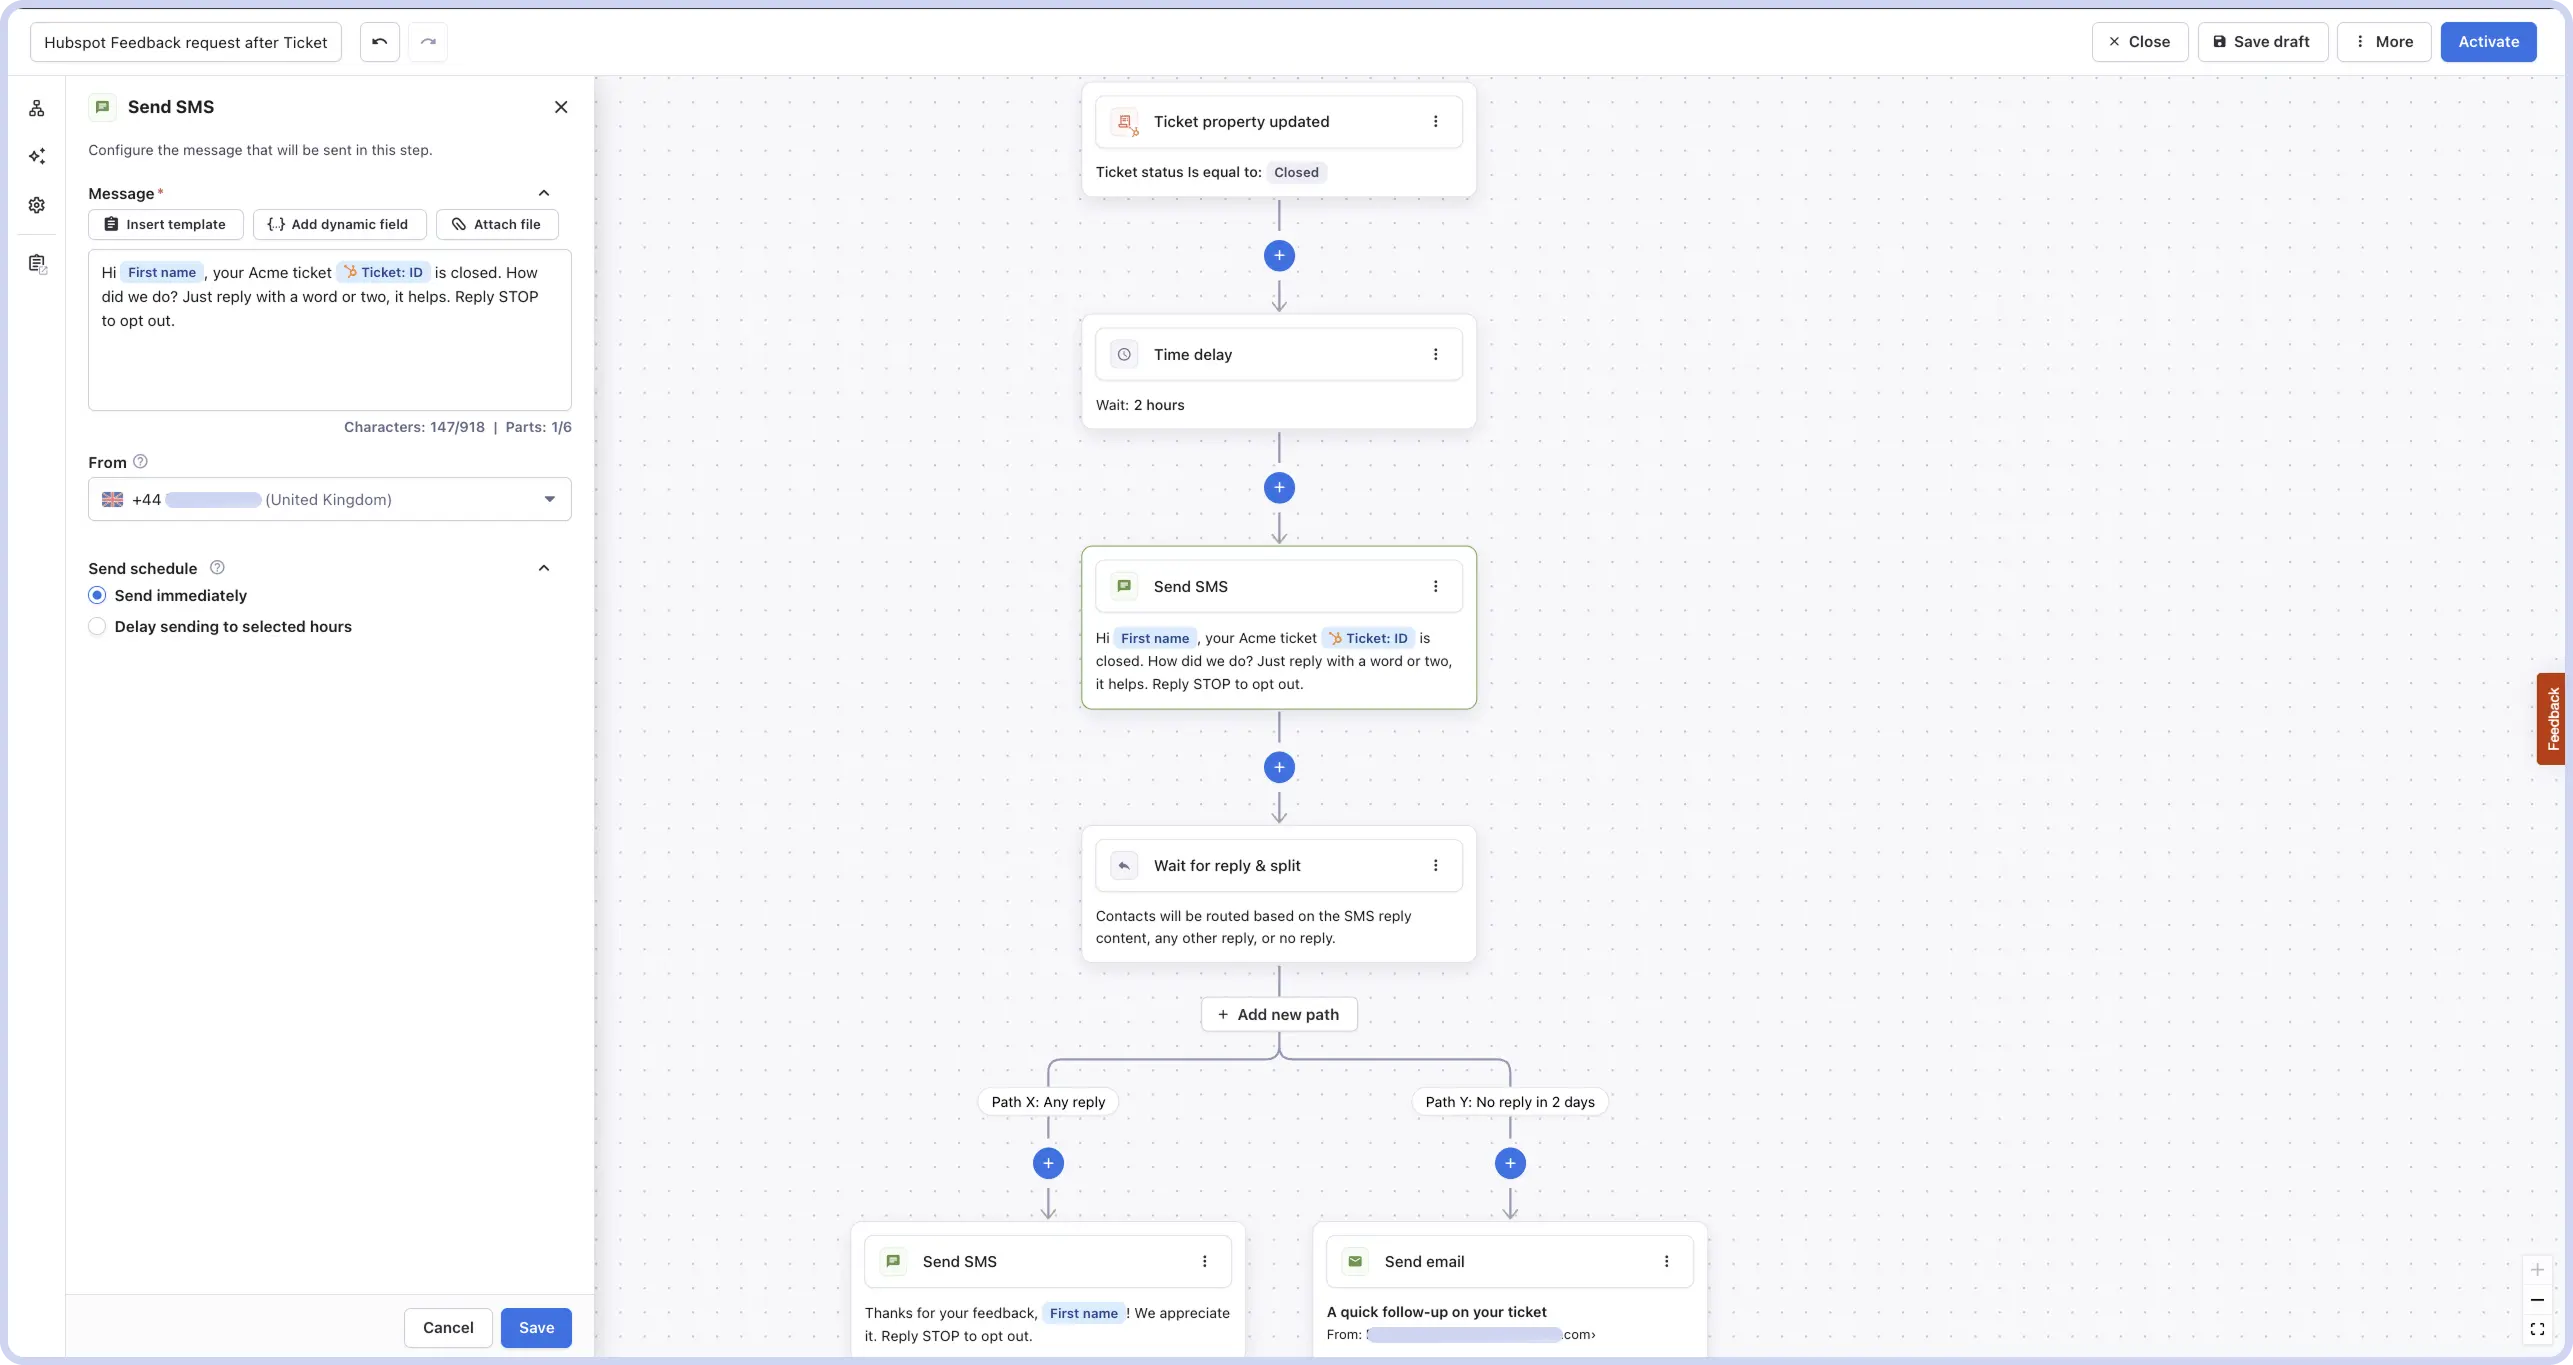
When a ticket moves to Closed, wait a little so the customer has time to confirm that the issue really is resolved, then send a short feedback request.
- Trigger: Ticket property updated
- Filter: Status: Closed
- Actions: Wait → Send SMS
- Sample message: Hi {First name}, your Acme ticket #{Ticket ID} is closed. How did we do? Just reply with a word or two, it helps. Reply STOP to opt out.
For a more structured process, link to a survey or review page. For a lower-friction approach, simply ask the customer to reply and keep the conversation in SMS.
Bonus: more automations you can build
The examples above cover the main workflows, but the same triggers and actions can support plenty of smaller automations too. Here are a few ideas you can adapt to your own process:
- Clean up after an opt-out. Textmagic already syncs opt-out status automatically, but you can use an automation to handle the extra housekeeping: remove the contact from a list, remove tags, and add a note in HubSpot recording when and how they opted out.
- Write keyword campaigns back to HubSpot. When someone texts a keyword to join a campaign, add a tag in Textmagic and place the contact in the relevant HubSpot list. This can work well for events, webinars, or other opt-in campaigns.
- Follow-up with contacts after they place an order. If you are tracking orders through HubSpot, you can now send texts or emails, move orders to the next stage, add notes, and more.
- Send an out-of-hours reply. Set the flow schedule to run outside your normal support hours. When a new conversation or support ticket comes in during that window, send an automatic acknowledgement, then add a note or create a task for the team to follow up the next day.
- Learn from lost deals. When a deal moves to Closed lost, send a short SMS asking what influenced the decision. Replies can stay attached to the contact record, giving your team useful context for future sales conversations. If you follow up later with a win-back offer, treat that as a separate promotional message.
- Stop a nurture sequence when someone converts. Use stop another automation to remove a contact from an active nurture flow when they reply or move to a new lifecycle stage, so they do not keep receiving messages that are no longer relevant.
Connect HubSpot and build your first flow
Sign up for a free trial and test the HubSpot integration yourself.
Before you turn your HubSpot automations on
Get consent before you start texting. HubSpot’s built-in form consent option doesn’t cover SMS, so you need to collect it separately and filter your automations on it.
The simplest route is a Textmagic SMS subscribe form, which captures the opt-in with the required disclosures already in place and adds the contact to a list you can use in your flows.
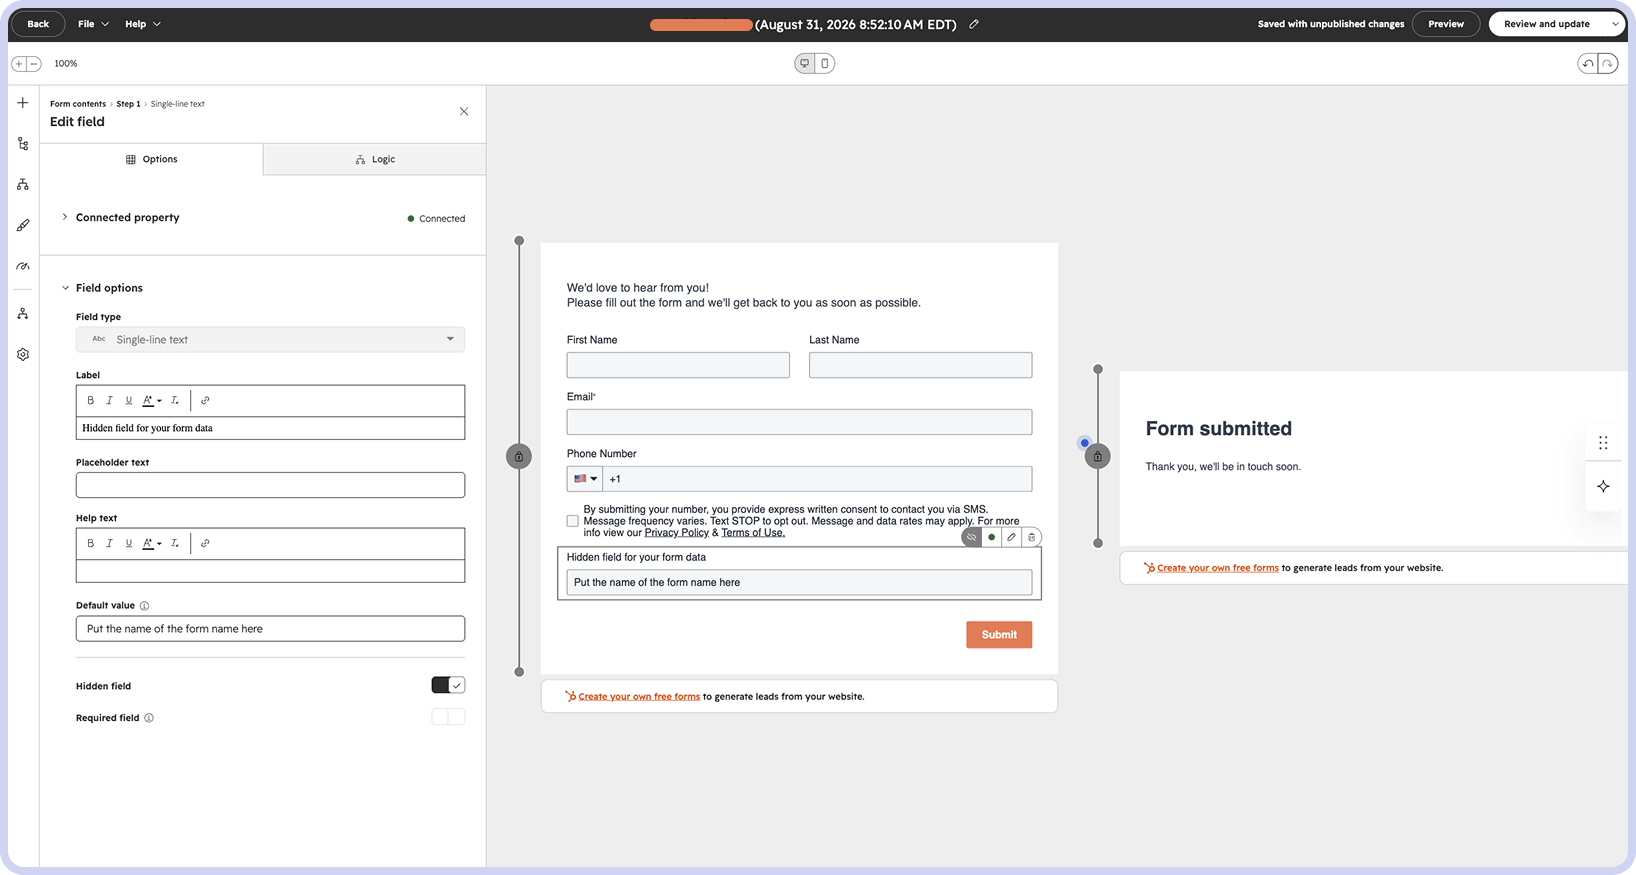
If you’d rather collect consent on a HubSpot form you already have:
- In HubSpot, go to Settings → Properties → Create property, choose Contact, and set the field type to Single checkbox.
- Add it to the form as a separate, unchecked SMS consent checkbox, with wording that explains what the contact is agreeing to.
- Map the property to Textmagic during setup, then use it as a filter so only opted-in contacts enter your SMS automations.
Opt-outs work in the other direction on their own. If someone replies STOP, Textmagic unsubscribes the number and syncs the opt-out status back to HubSpot.
US senders need a registered number first. Messages sent from an unregistered number won’t deliver, regardless of how the automation is built. If you’re texting US contacts, complete 10DLC or toll-free verification before you turn any of these flows on.
A good HubSpot automation is usually a filtered automation. A trigger such as Contact property updated or Deal property updated can fire for many different changes. Add the lifecycle stage, pipeline, ticket priority, record source, or whichever property makes the message relevant before switching the flow on.
Deal and ticket automations text the contact associated with that record. If a deal or ticket has no associated contact, or that contact has no mobile number, there’s nobody to message. It’s worth checking how consistently your team associates records before turning these flows on.
Sent, delivered, failed and received messages all land on the HubSpot contact record, next to the emails and calls.
Map the properties you’ll actually use. You don’t need every HubSpot field inside Textmagic, just the ones you’ll use for filtering, personalization, or automation logic. Decide before you connect: properties left out of the initial mapping can’t be added to it later.
Sync and automations do different jobs. Contact details flow from HubSpot into Textmagic on their own. Writing anything back to HubSpot only happens through an automation action you’ve deliberately added.
Build the flows that remove work from your day
Connect HubSpot and build your first flow
Sign up for a free trial and test the HubSpot integration yourself.
You do not need all 10 automations on day one. Start with the events your team already reacts to manually. Build that flow first, then add the next repetitive handoff. The Textmagic AI flow builder can also do the initial build for you.
Once HubSpot and Textmagic are connected, the CRM already has most of the information the automation needs. The useful part is deciding what should happen next.

Related articles

What is product-led growth, and how to apply it to your SaaS company
PLG (product-led growth) is gaining popularity as th...

When was texting invented: A history over 30 years in the making
From the early days of mobile communication to the b...

How to integrate Textmagic Tasks into your daily work routine
Teams can sometimes struggle to remain productive an...

16 Key metrics for measuring and improving customer engagement
Customer engagement metrics assess the emotional con...

20 Contact segmentation ideas to save hours on follow-ups
Segments in Textmagic help you skip the repetitive w...